Chair Spinning
Ever wanted to spin around in a chair like a child? Now you can! This tutorial shows you how to add controllable spinning to your character and chair.
Dizzy dizzy!
Preparing the Chair Prop
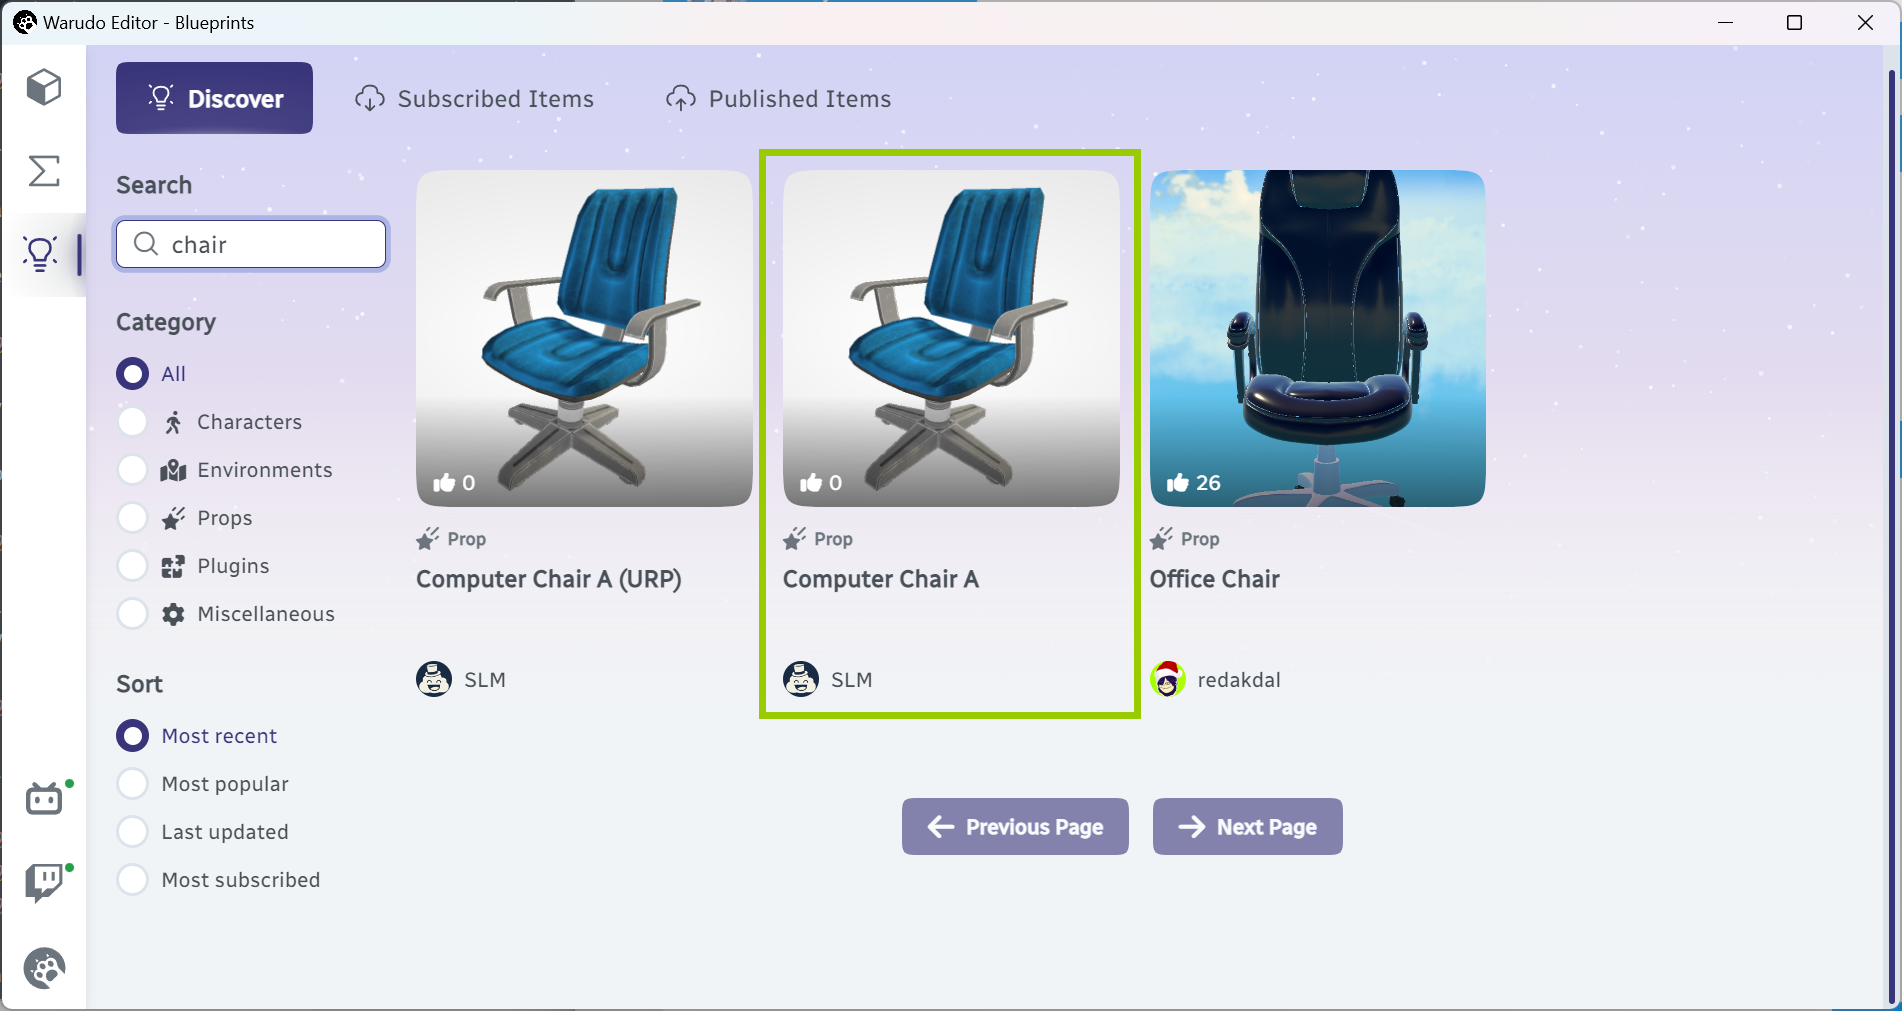
Technically you don't need a chair prop for this tutorial, but it will be more fun if you have one. You can download our Computer Chair prop from the Steam Workshop using the Discover tab in Warudo. (Of course, you can also import your own chair prop using our Mod SDK!)
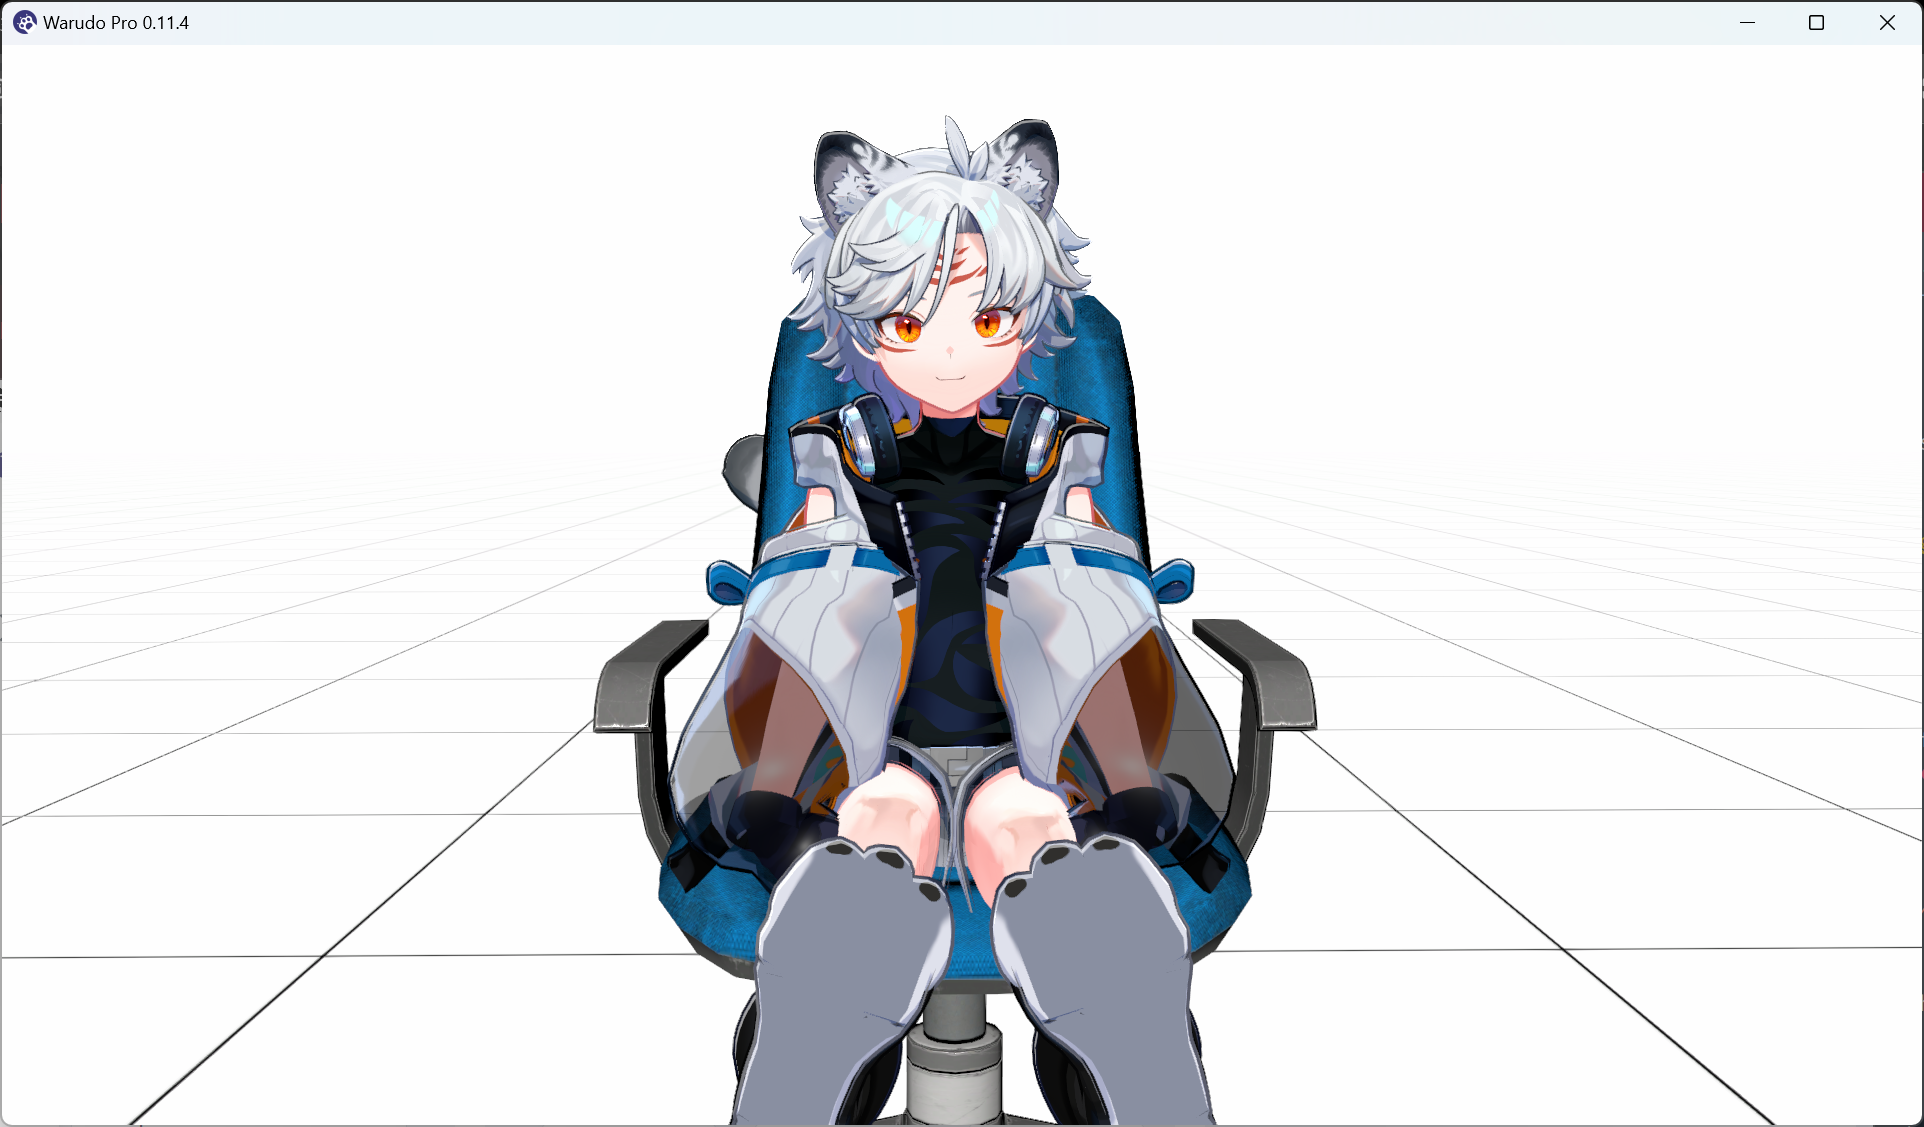
Set up your character and chair prop so that the character is sitting on the chair:
Rotating Our Character
You might remember the Set Asset Transform node from the Animating the Camera tutorial. However, since we only care about the rotation of the character, we can use the Set Asset Rotation node instead. (Recall that a transform is a combination of position, rotation, and scale.) Can you guess what the following node does when triggered?
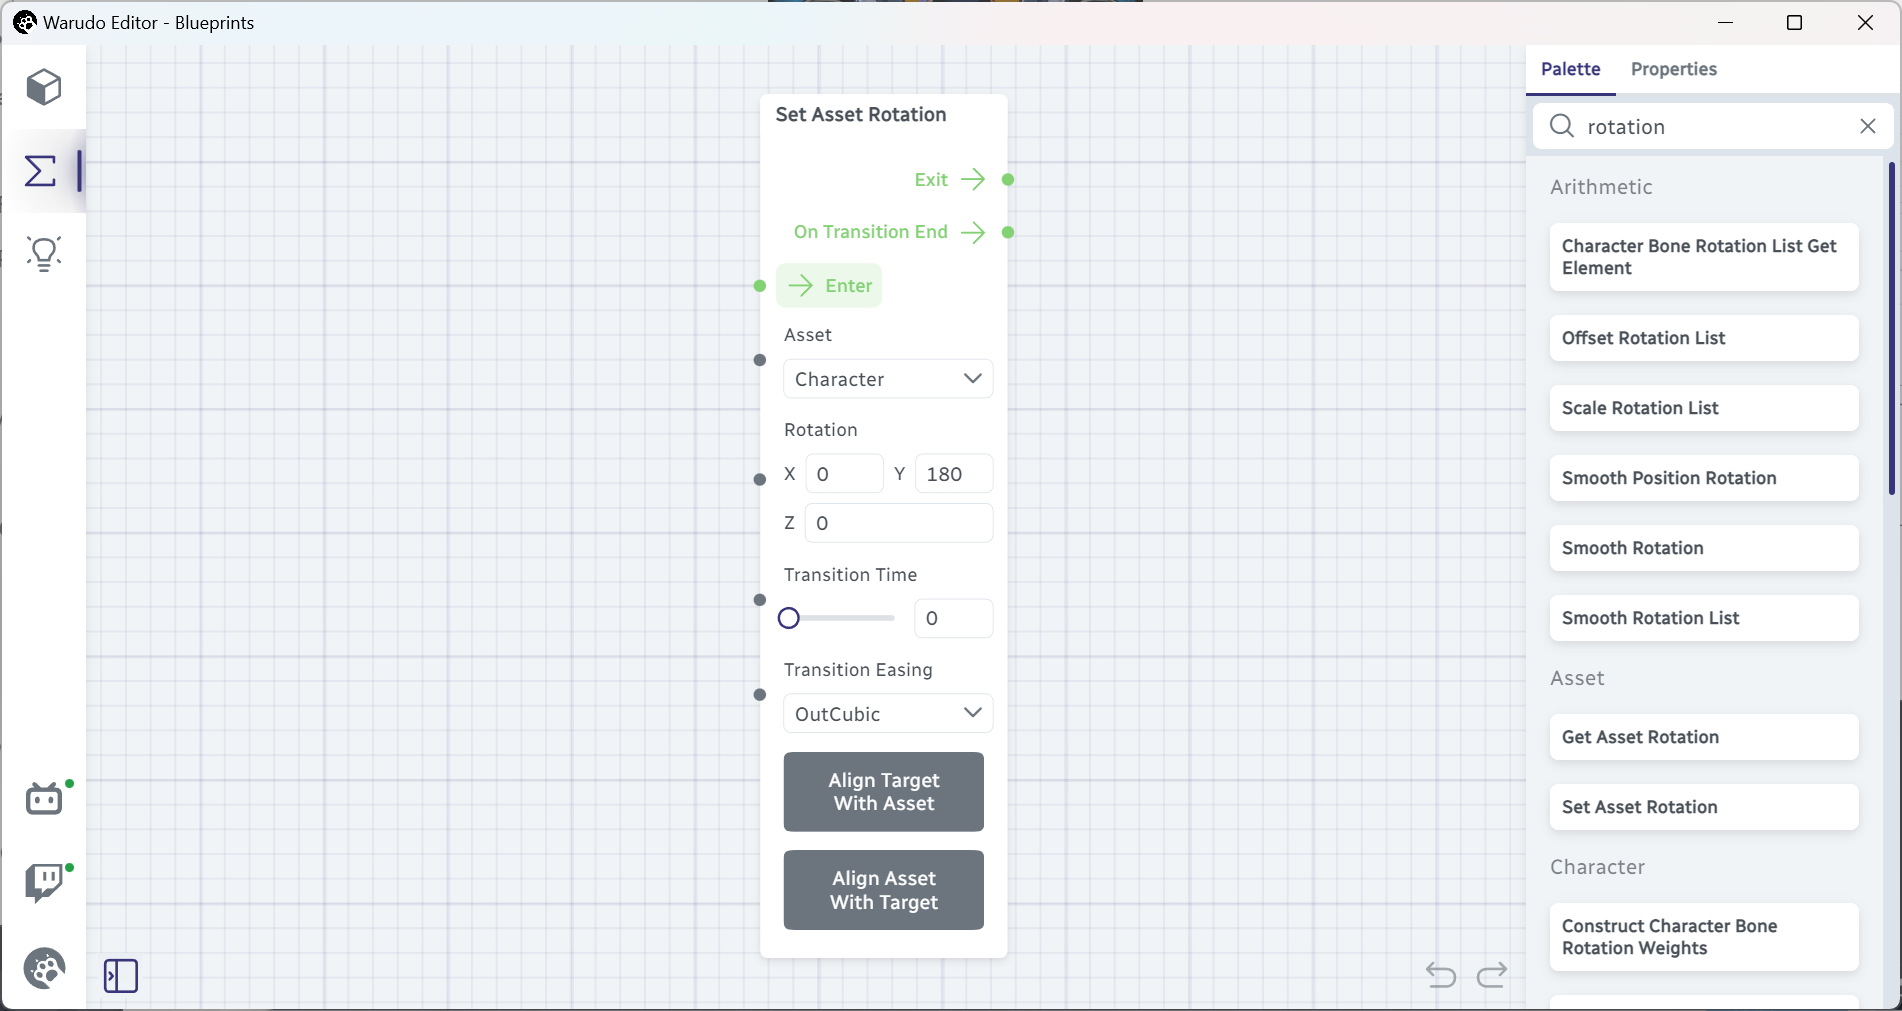
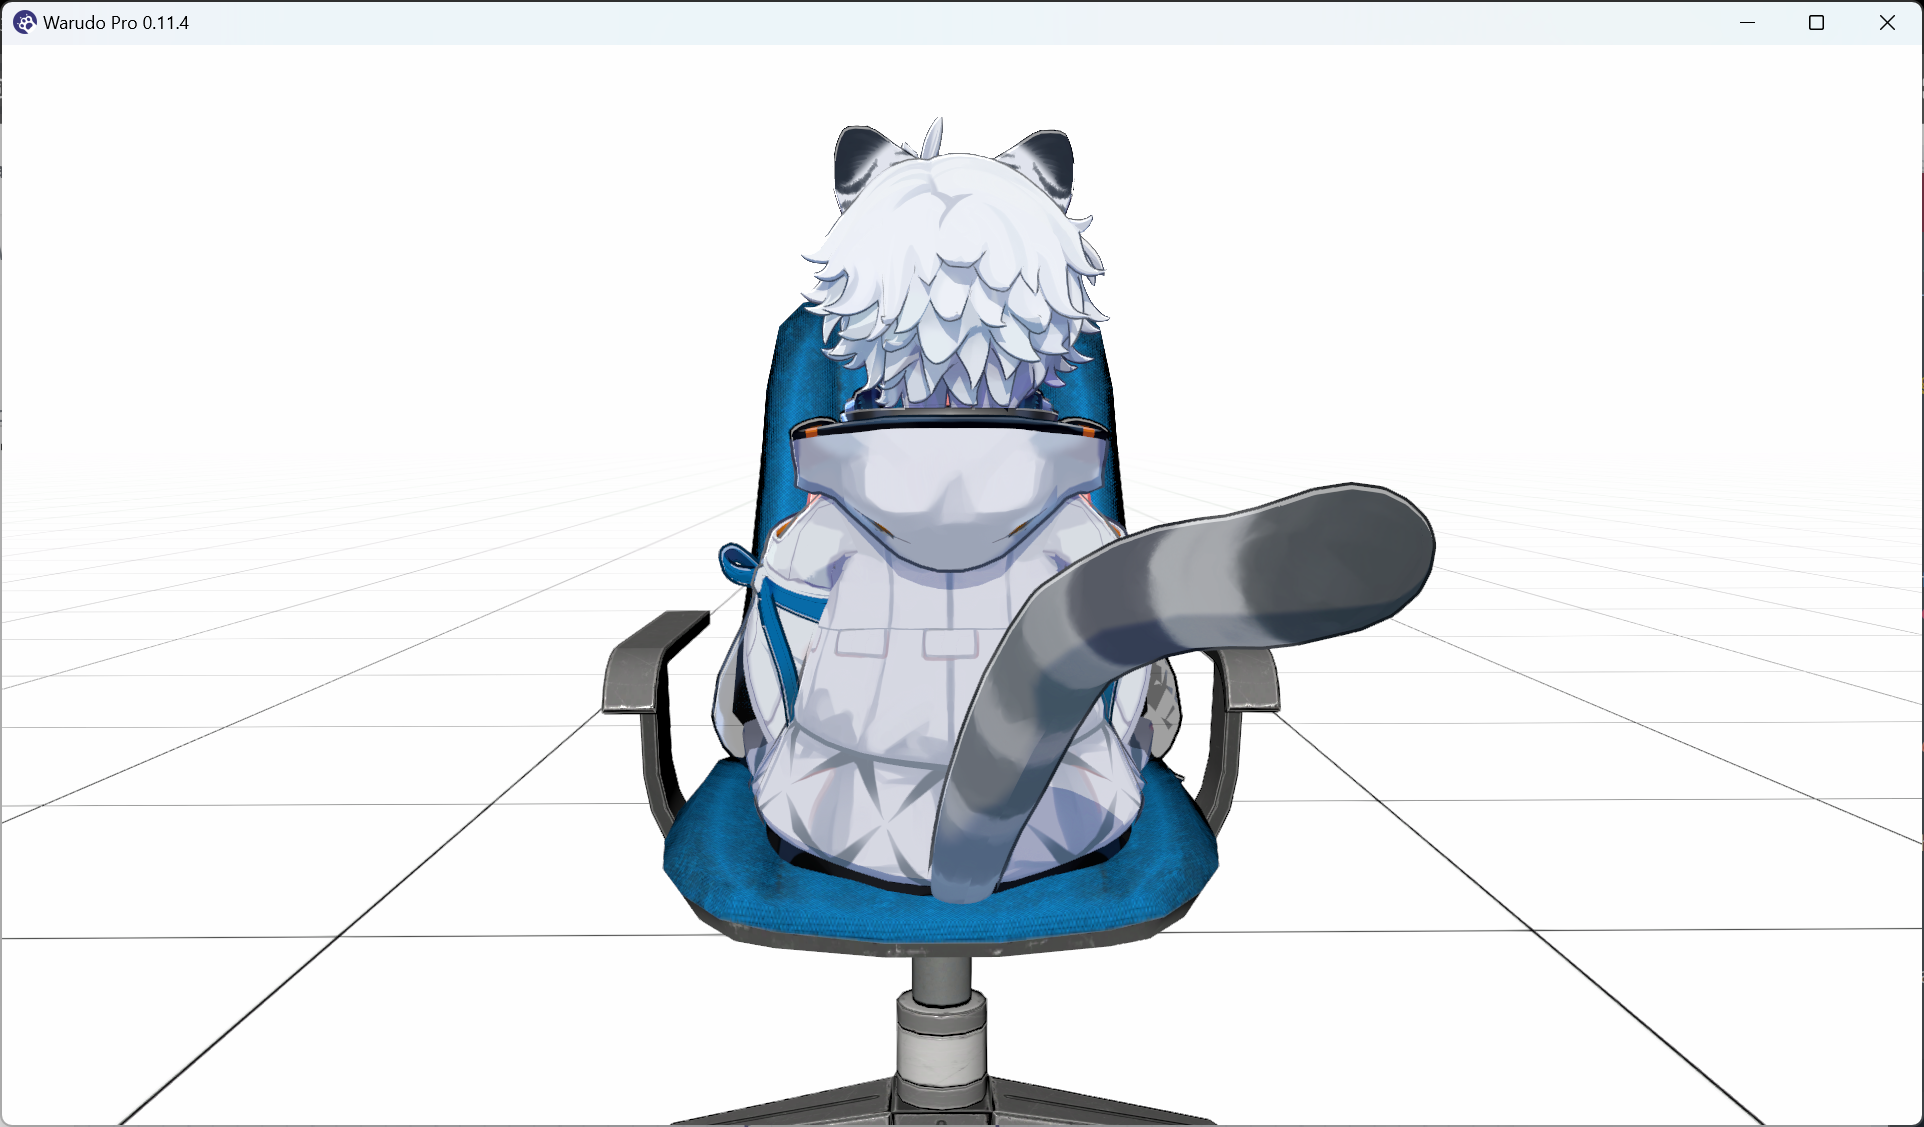
It rotates the character to (0, 180, 0). Since the Y axis is pointing up, you can imagine the character rotated 180 degrees by a pole going through their head and coming out of their feet. The result is they are now facing the back of the chair!
Can you guess what happens if you rotate the character to (180, 0, 0)? What about (0, 0, 180)? Try it out!
By now, you should probably intuitively know our next step: we need to connect something to the Rotation data input of this node. This something should be a value that changes over time, so that the character rotates over time. You may think of using variables, but there is an easier way.
Let's think about this for a moment. Say the character originally has rotation (0, 0, 0). We want to rotate them to (0, 180, 0). How do we do that? Well, we can directly rotate them to (0, 180, 0), but that's just a sudden change in rotation like above, which is not very interesting. Maybe we will take one more step in between: rotate to (0, 90, 0) first, then to (0, 180, 0) a few moments later. Or even more steps in between: (0, 30, 0), (0, 60, 0), (0, 90, 0), (0, 120, 0), (0, 150, 0), (0, 180, 0). How about even more steps? (0, 10, 0), (0, 20, 0), (0, 30, 0), ..., (0, 180, 0). The gist is: as long as we have enough steps, it will look like the character is rotating smoothly!
Now when we look at this sequence: (0, 10, 0), (0, 20, 0), (0, 30, 0), ..., (0, 180, 0), we can see that the Y axis is increasing by 10 every step. In other words, for every step, as long as you tell me the current rotation, I will tell you the next rotation: just add 10 to the Y axis!
This is exactly what the below blueprint does:
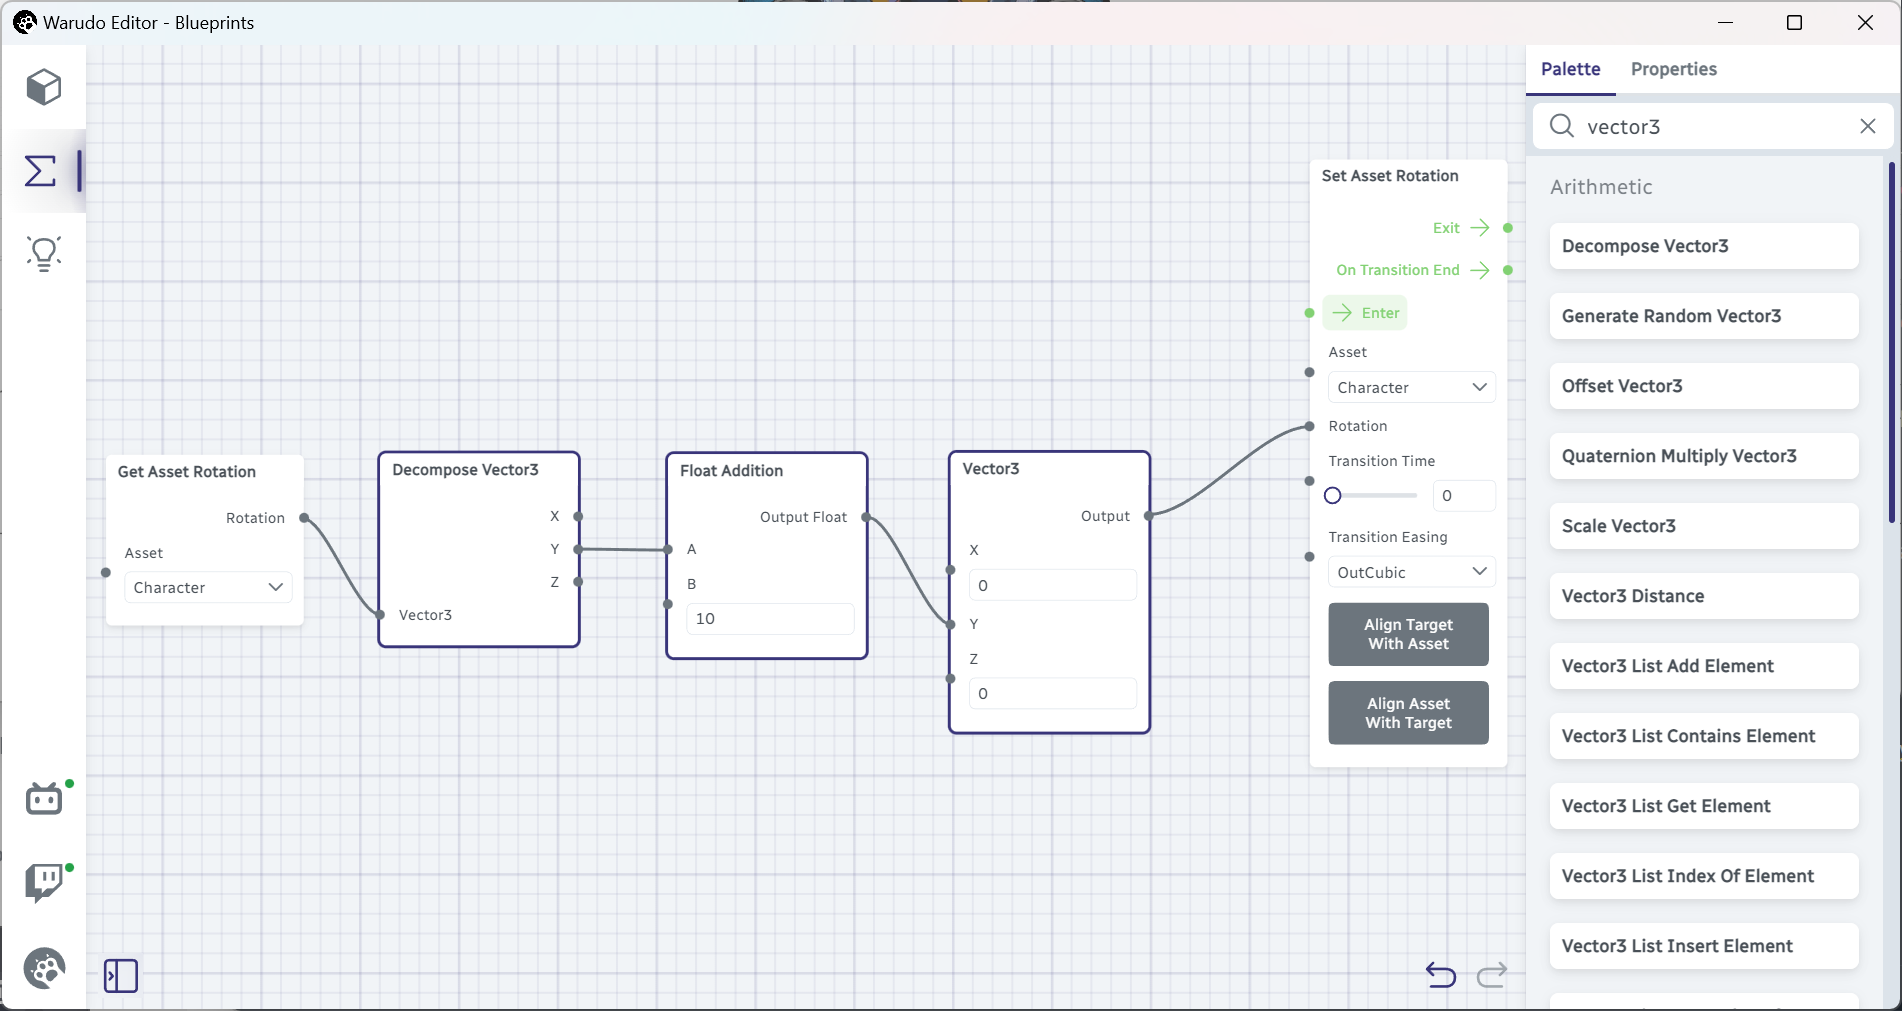
Let's unpack this. We are saying that instead of a fixed rotation, we want to use a changing rotation. This changing rotation is based on the character's current rotation; the current rotation (X, Y, Z) is decomposed into three numbers X, Y, Z, so we can read each number (the Decompose Vector3 node); we add 10 to Y (the Float Addition node); then, we create a new rotation (X, Y, Z) with our new Y, while X and Z remain 0 (the Vector3 node); finally, we set the character's rotation to the new rotation (the Set Asset Rotation node).
Try to click on the Enter flow input of the Set Asset Rotation node, and you will find that the character rotates by 10 degrees every time you click it!
To make the character rotate automatically, we can simply use the On Update node which is triggered every frame:
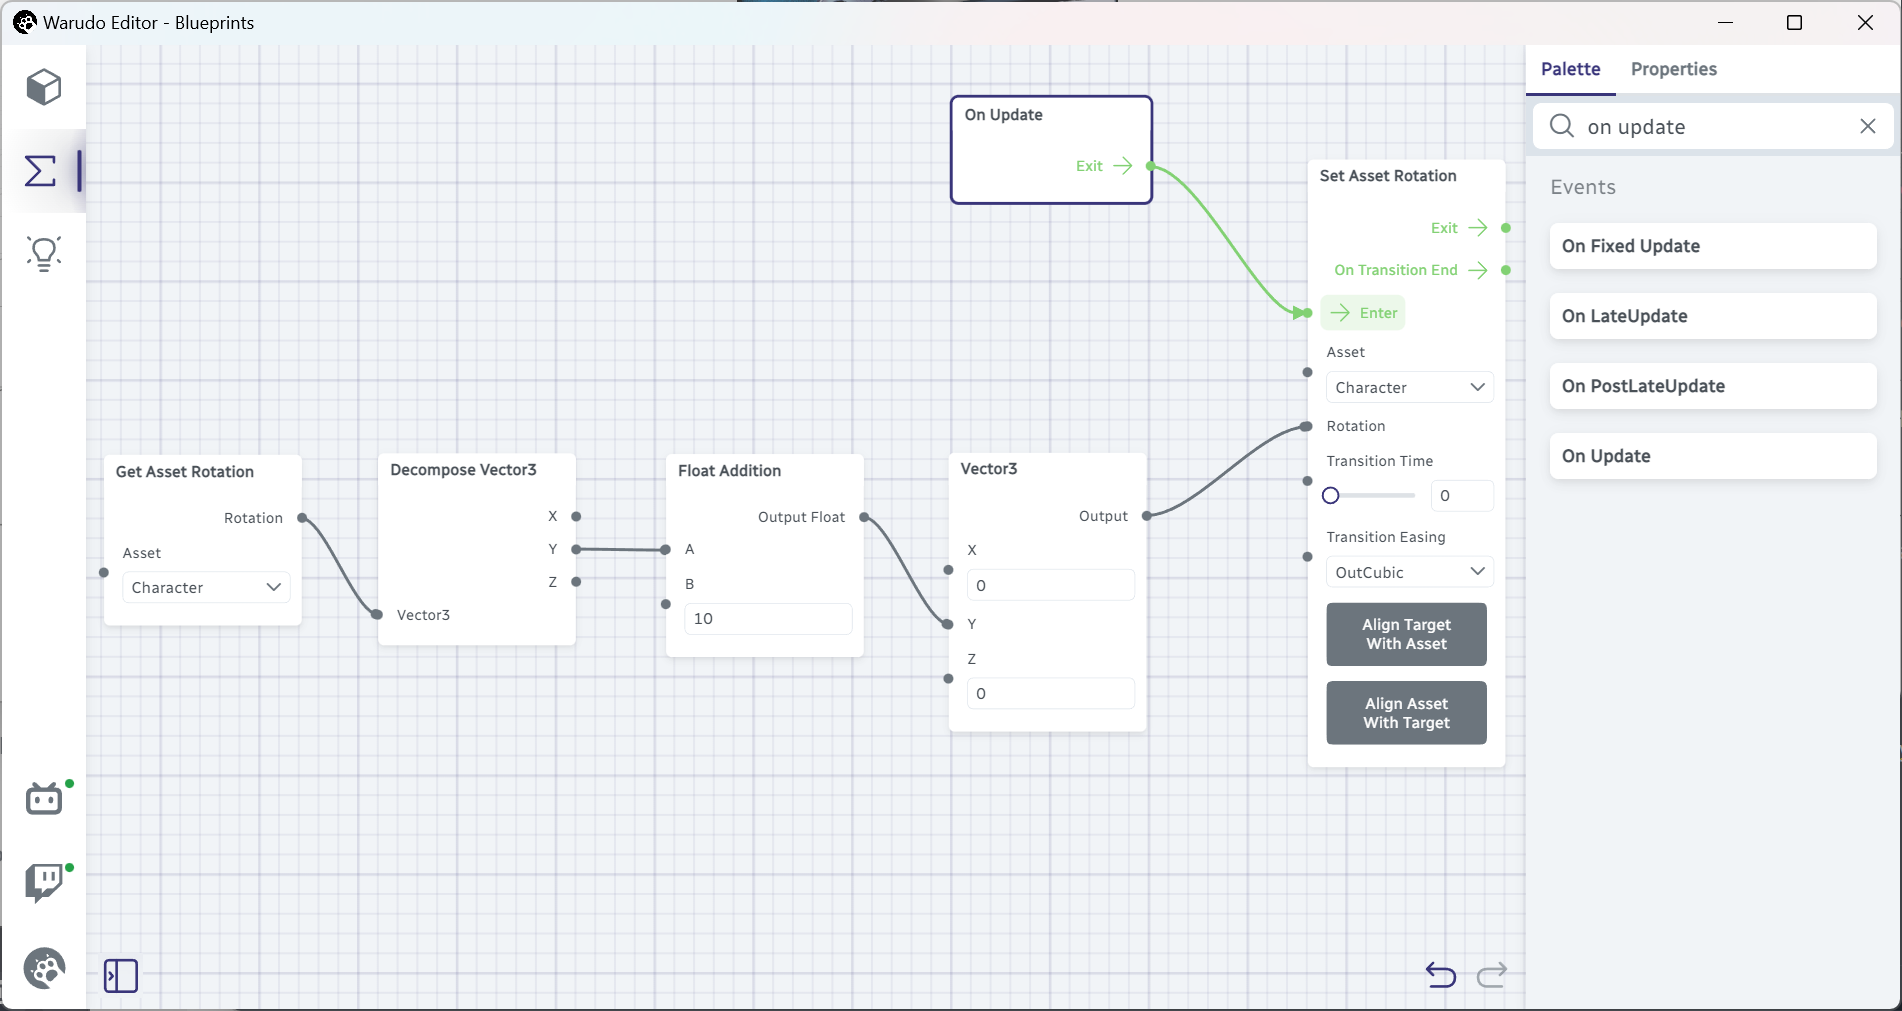
What should you change if you want the character to spin faster? What about slower? Can you think of a way to control the spinning speed by hotkeys? (Hint: you can use a variable to store the spinning speed.)
But that rotates the character only, so let's rotate the chair as well:
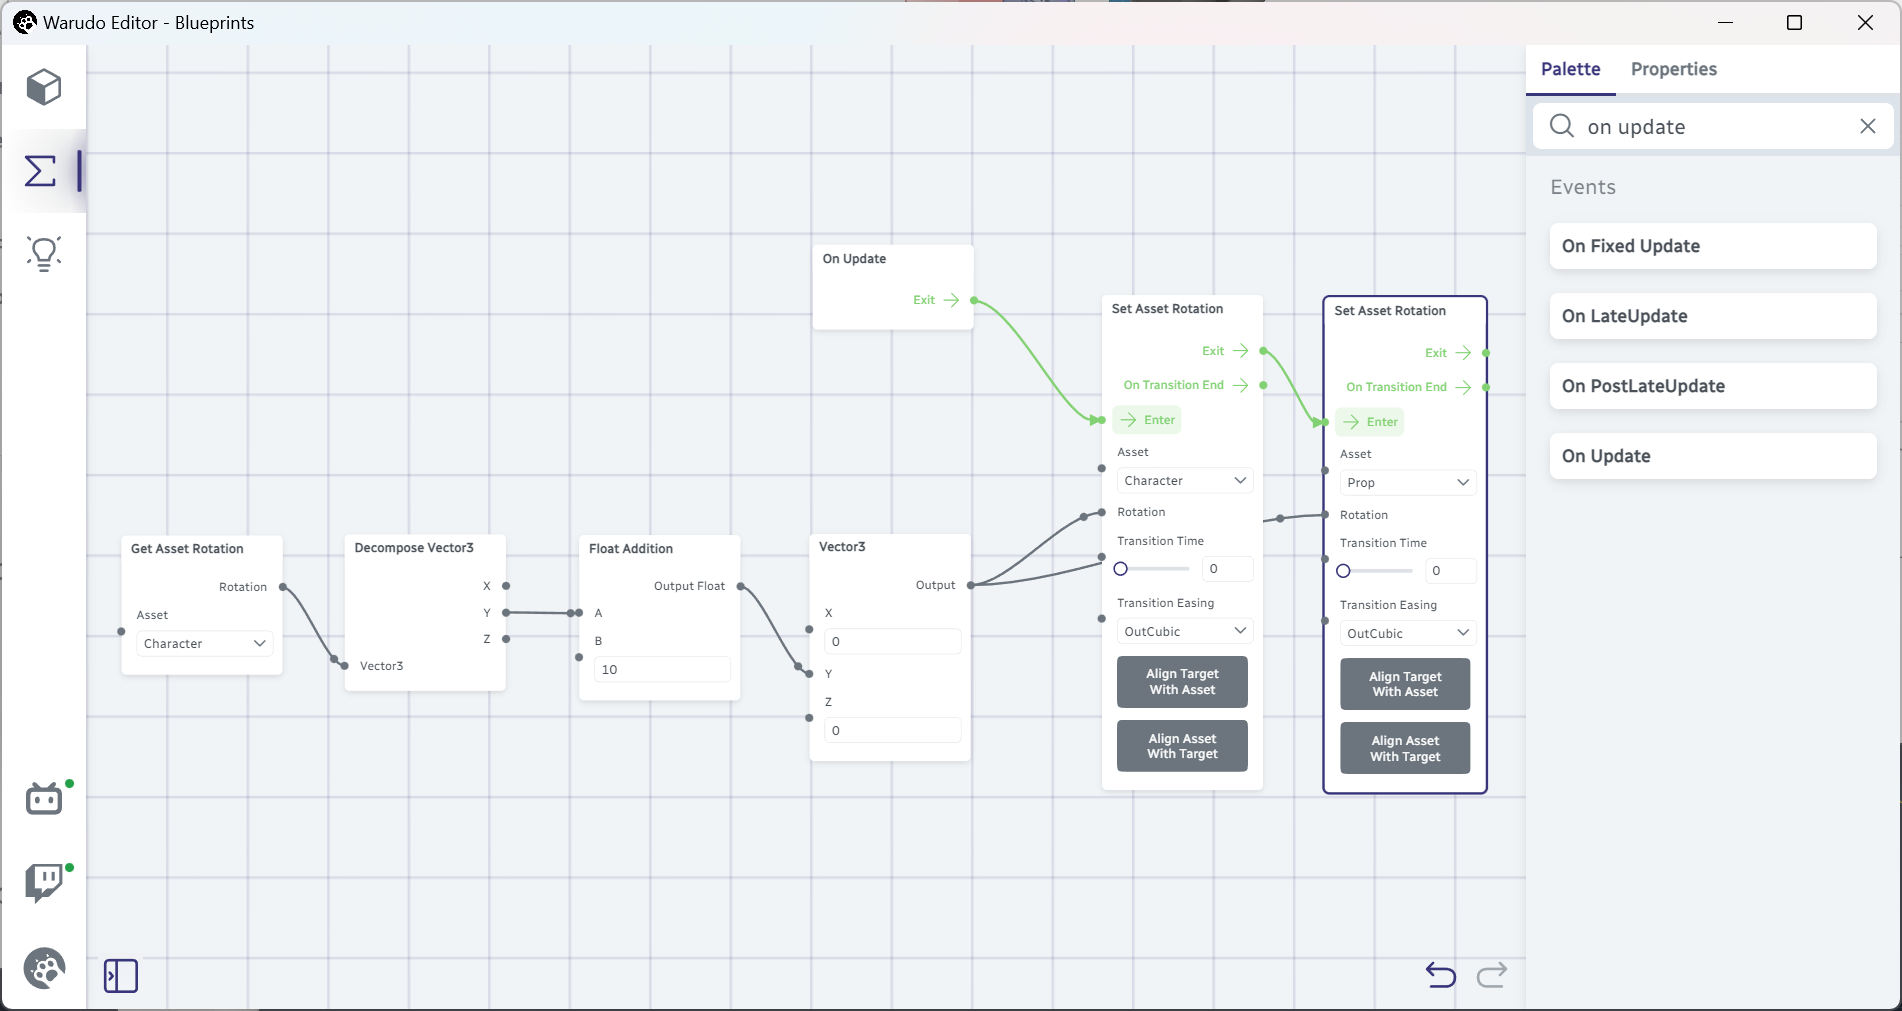
Now both our character and chair spin like a top!
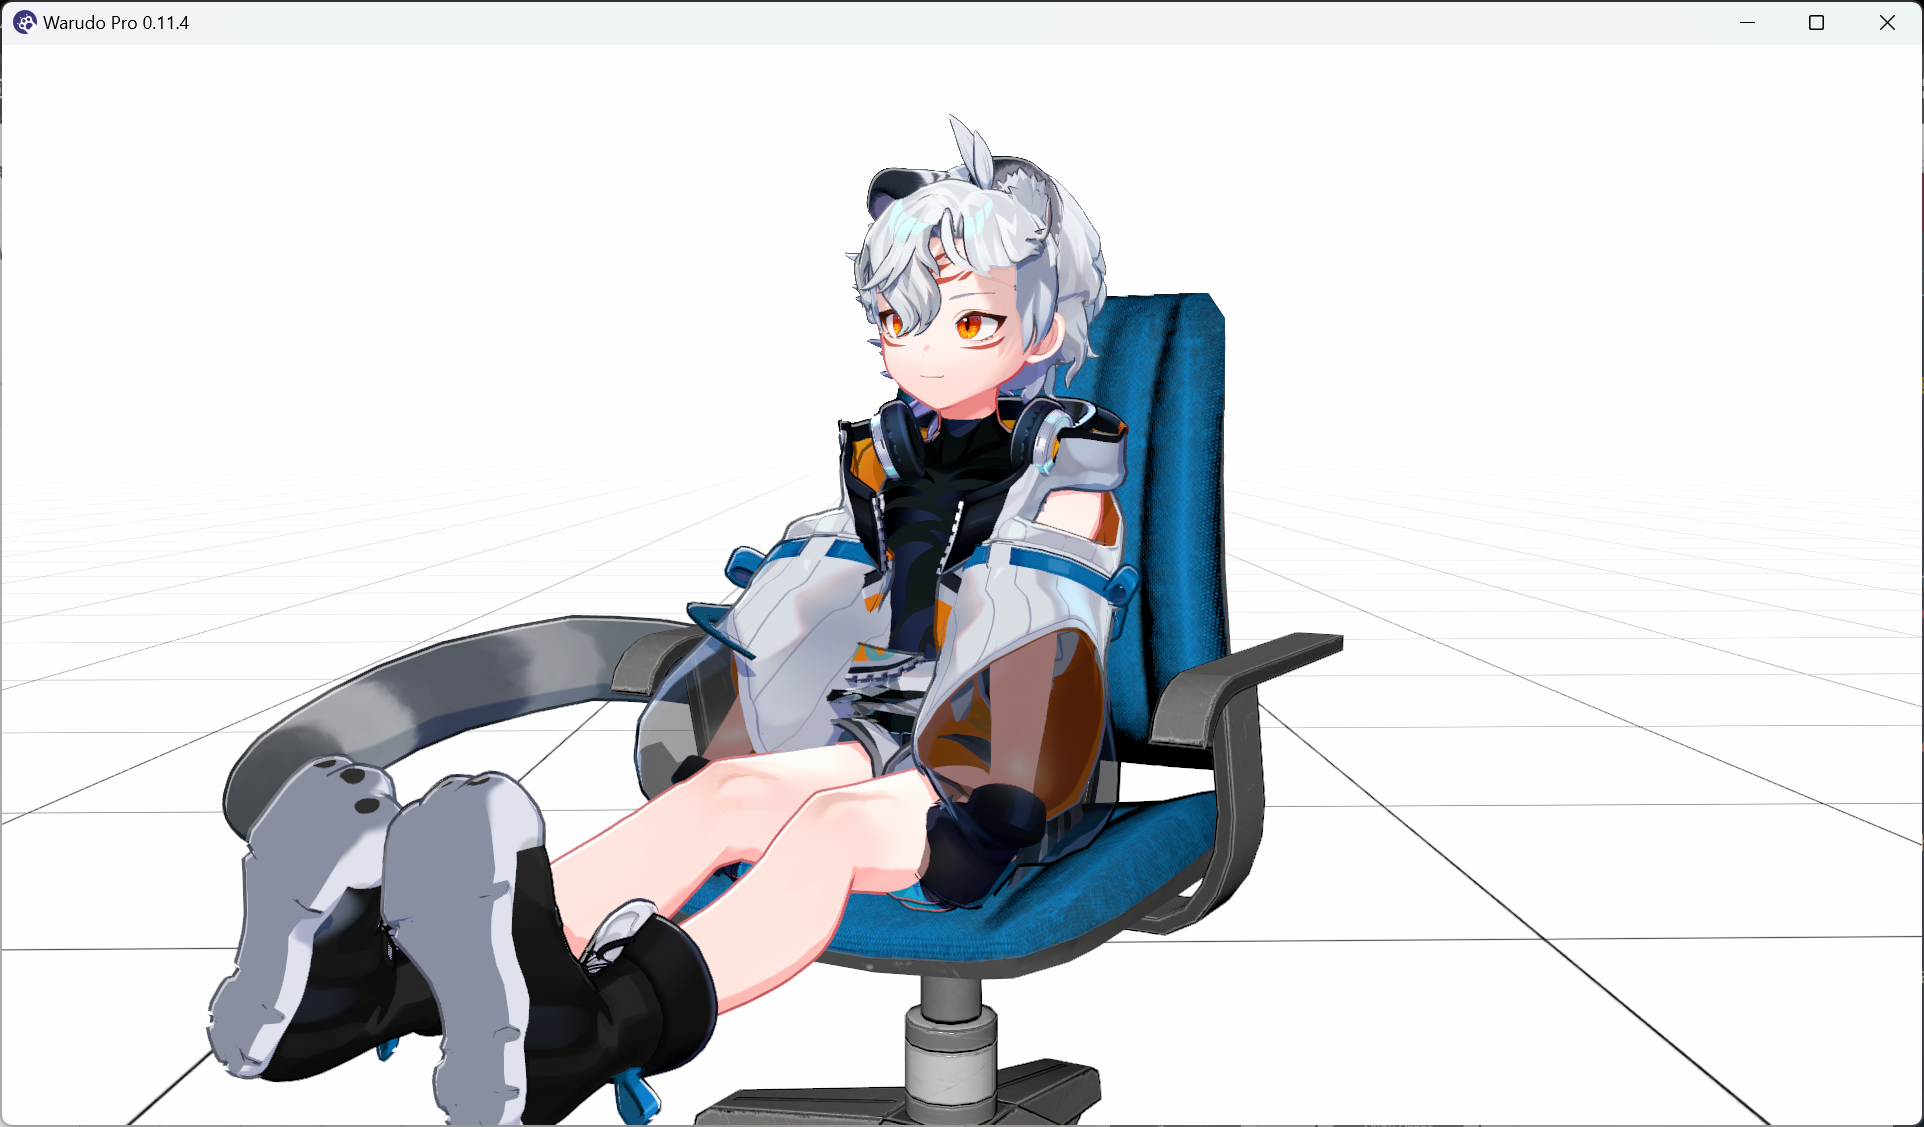
The chair prop you selected should by default have the same orientation as the character; otherwise, you may need additional nodes to rotate the chair to the correct orientation.
Gate
Now our character is spinning at full speed, how do we make it stop? Well, we can disconnect the On Update node:
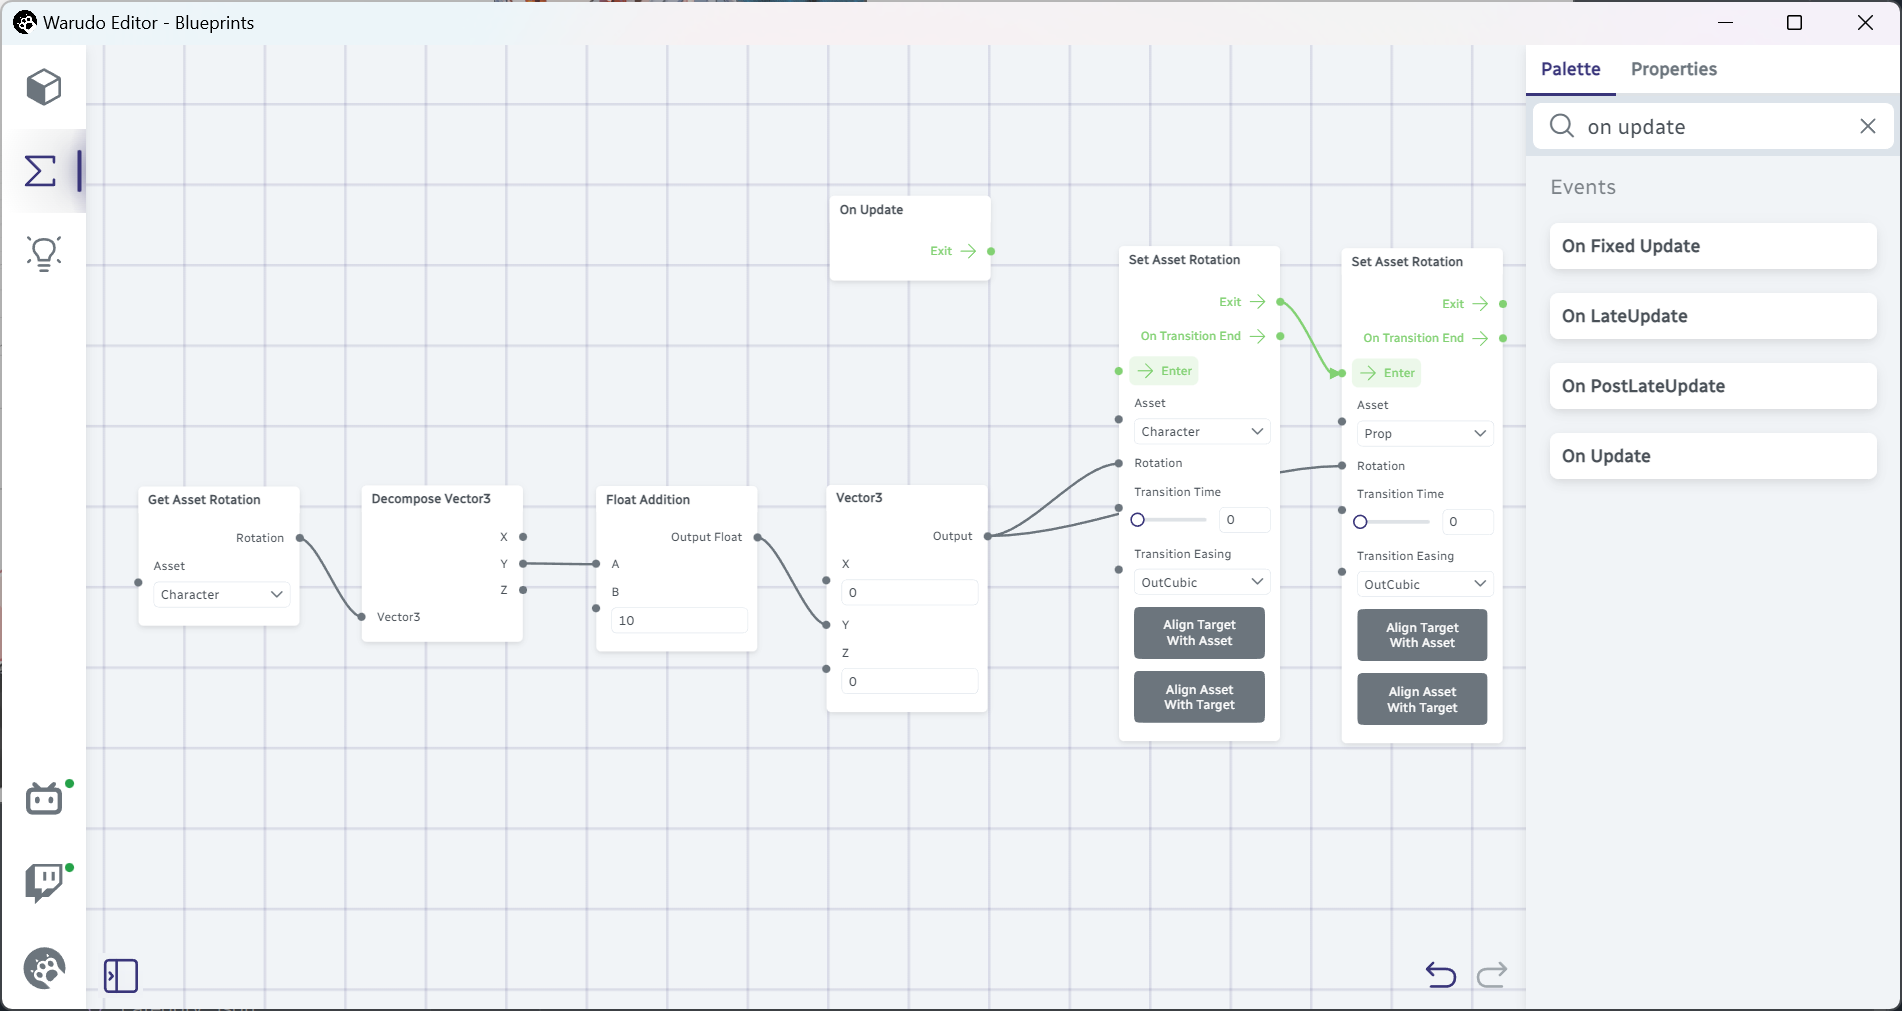
That's not convenient, though. We can also disable the blueprint, but let's try an alternative approach: let's find a way to stop the flow from the On Update node.
Imagine you live in a castle, and you want to stop the flow of people entering your castle. What will you do? Build a gate!
Similarly, we can use... the Gate node to stop the flow of the On Update node:
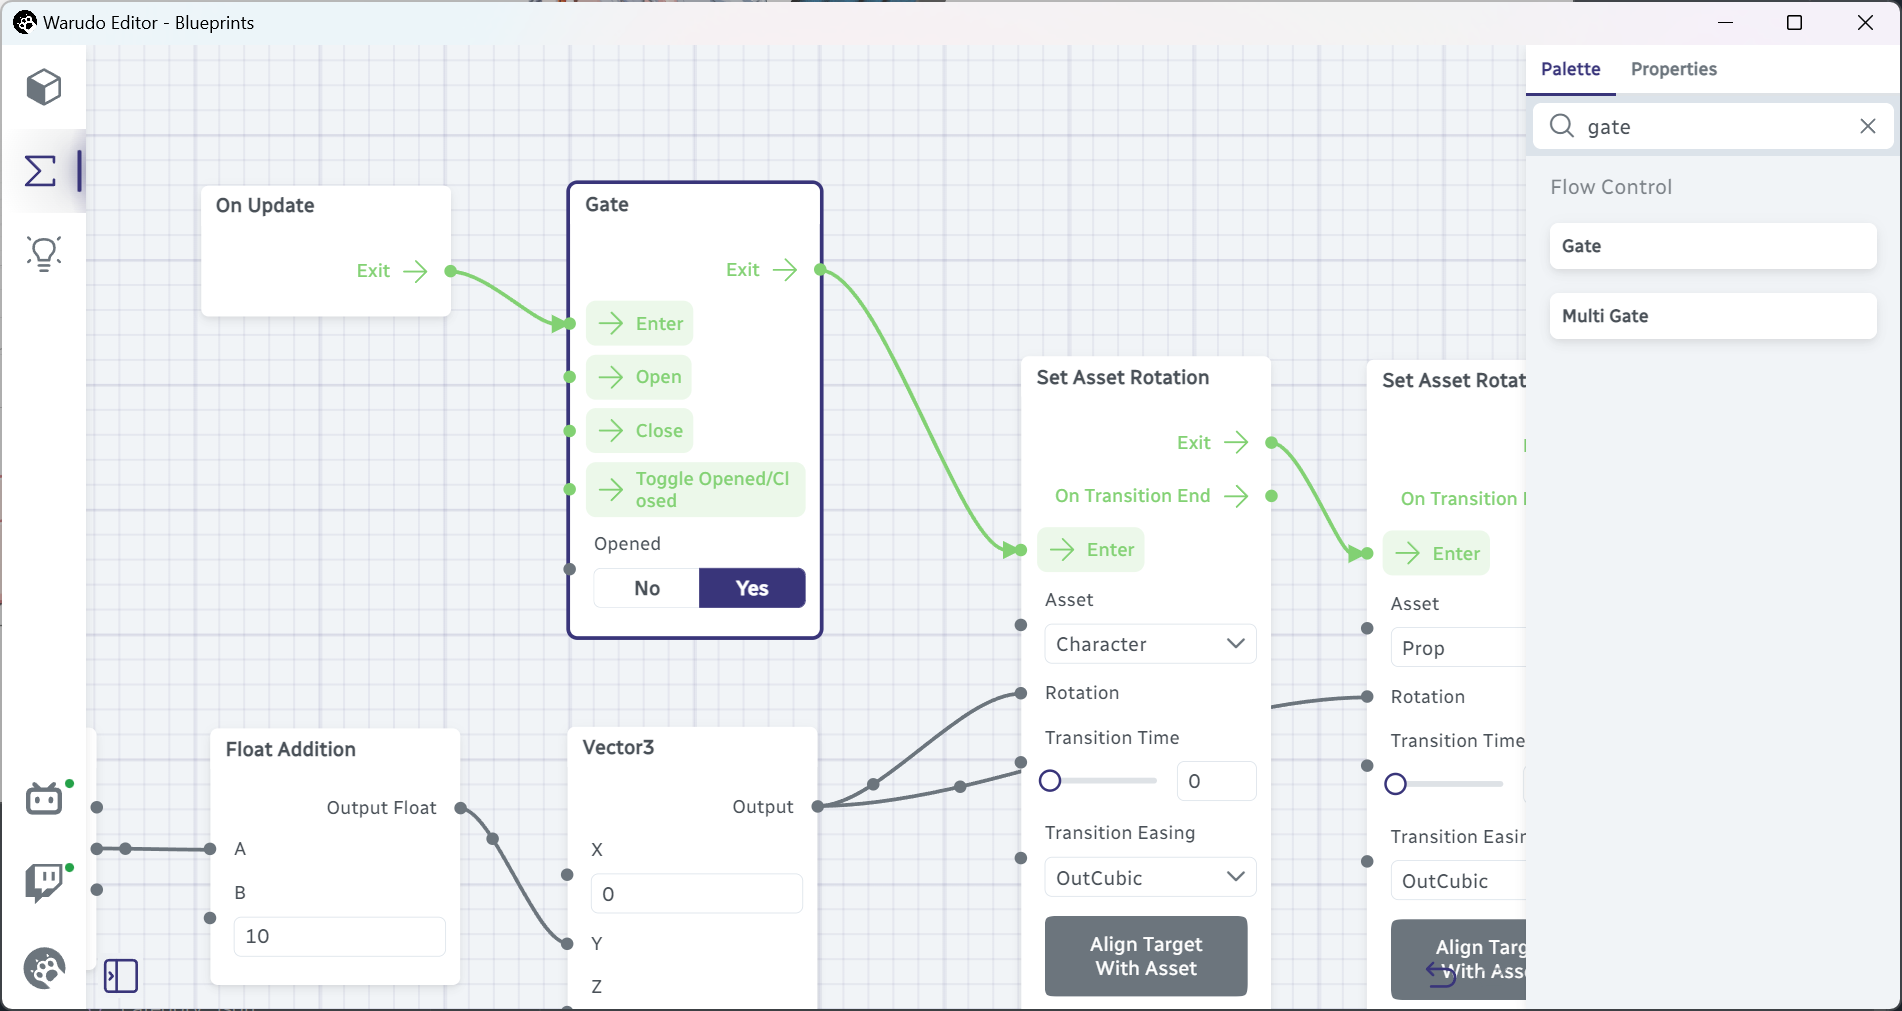
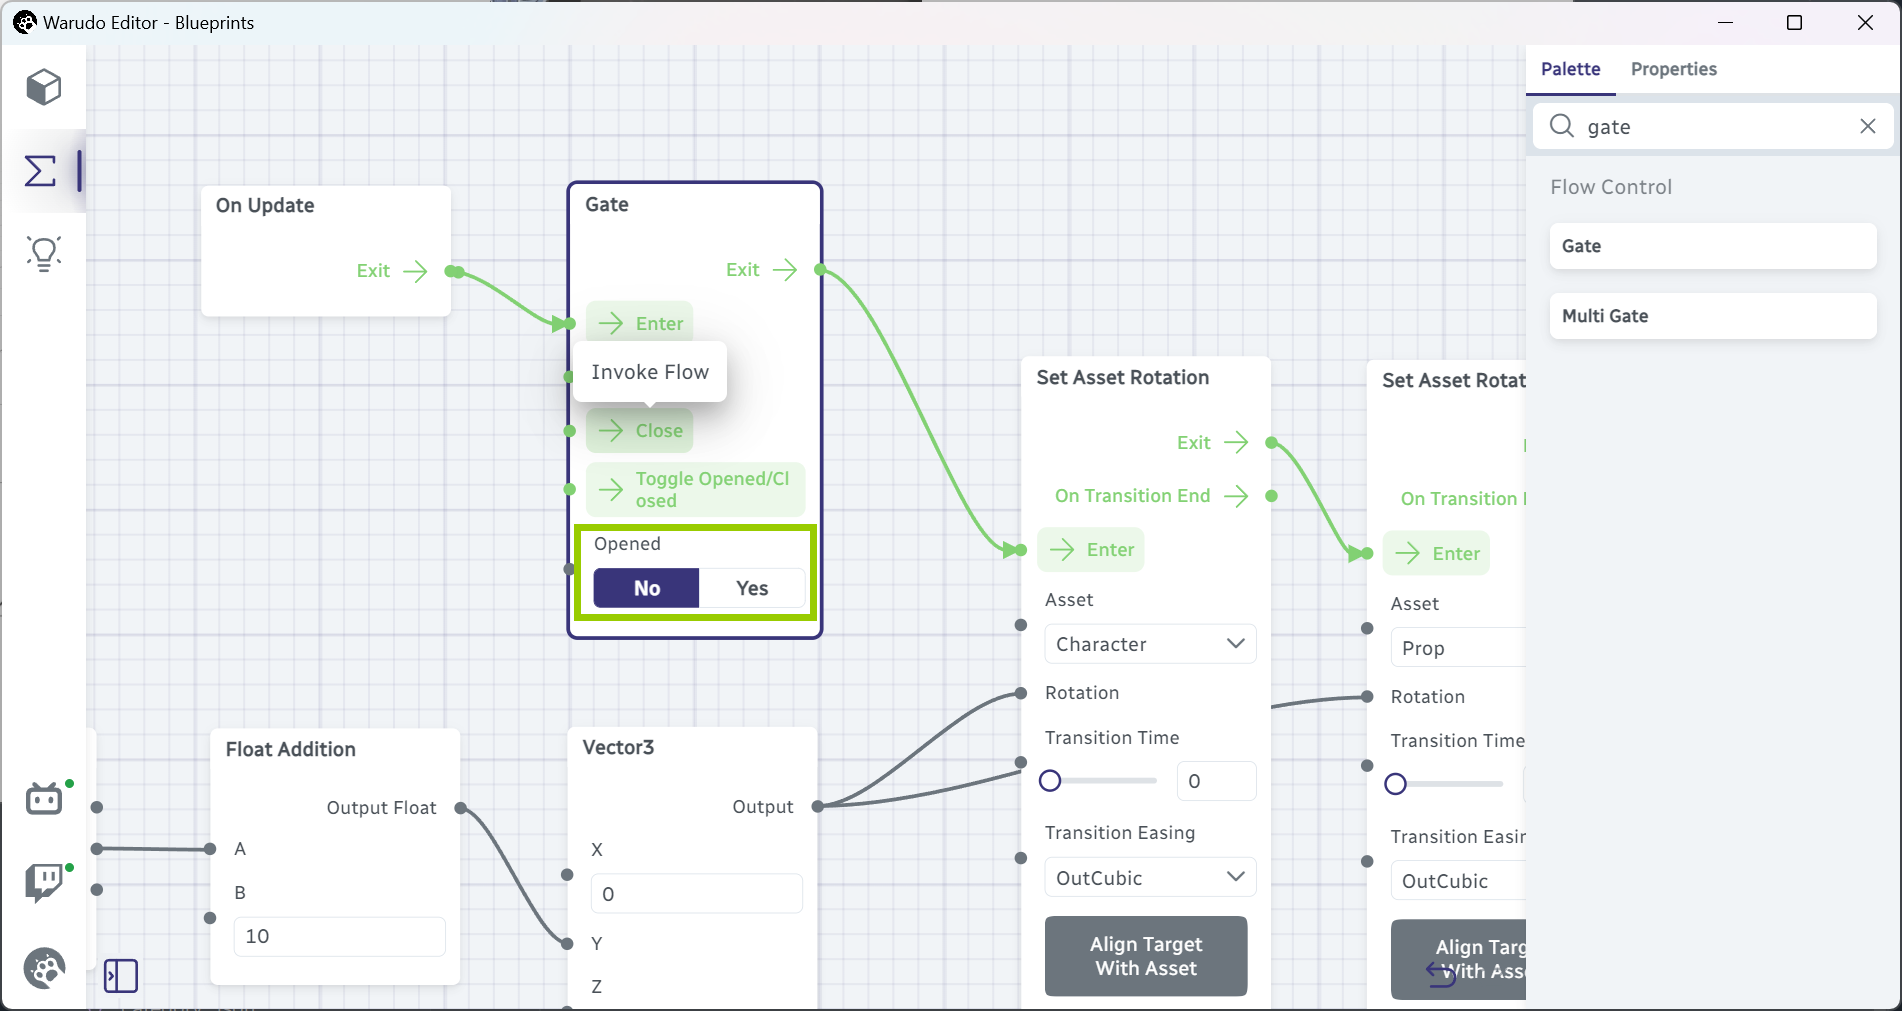
The Gate node is very appropriately named: a flow that passes through the Enter flow input is only allowed to pass through the Exit flow output if the gate is "open." By default, the gate is opened (Opened is set to Yes), but if you click the Close flow input, the gate will close (Opened is set to No), and no flow will be allowed to pass through the Exit flow output.
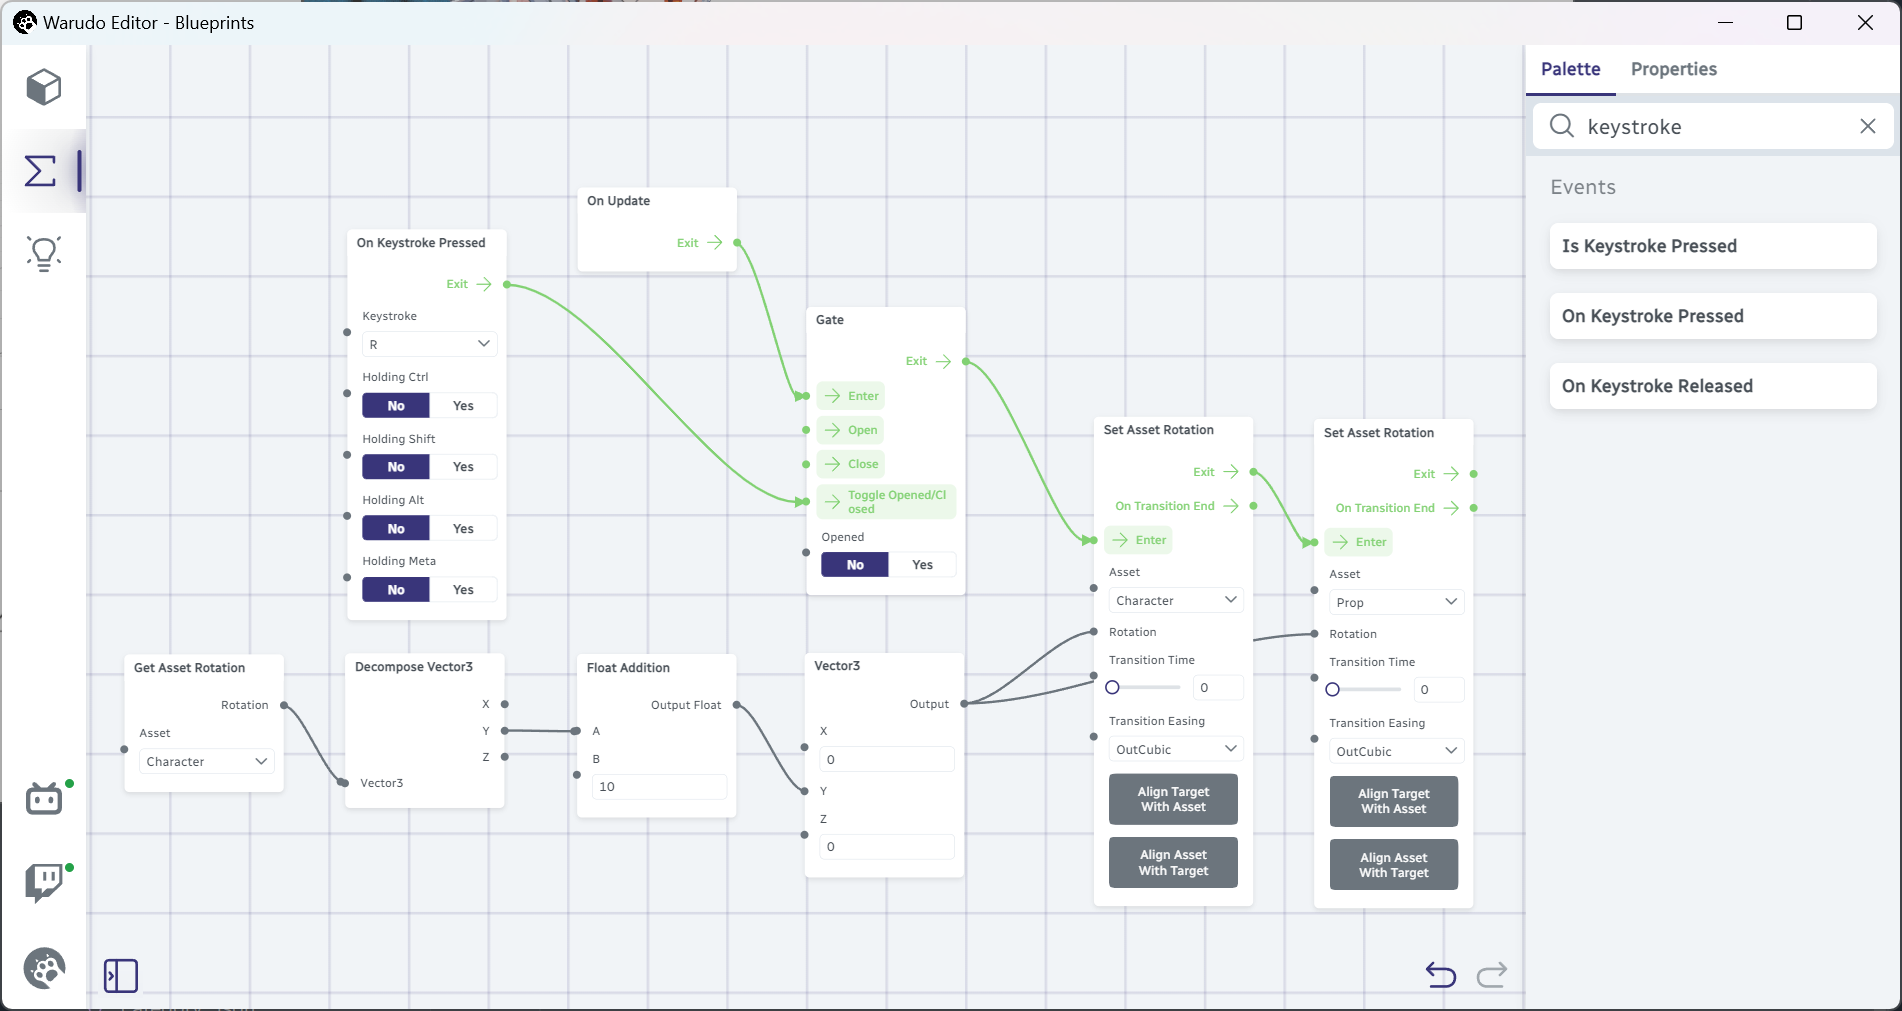
This means we can set up a hotkey to toggle the gate! Using the below blueprint, I can press R to toggle the gate at anytime, and the character will start or stop spinning accordingly:
Resetting Rotation
One problem with what we have so far is that when you press R to stop the spinning, the character and chair will stop immediately, even if they are in the middle of a spin. We probably want to rotate them back to their original rotation.
Let's add the below nodes to fix this:
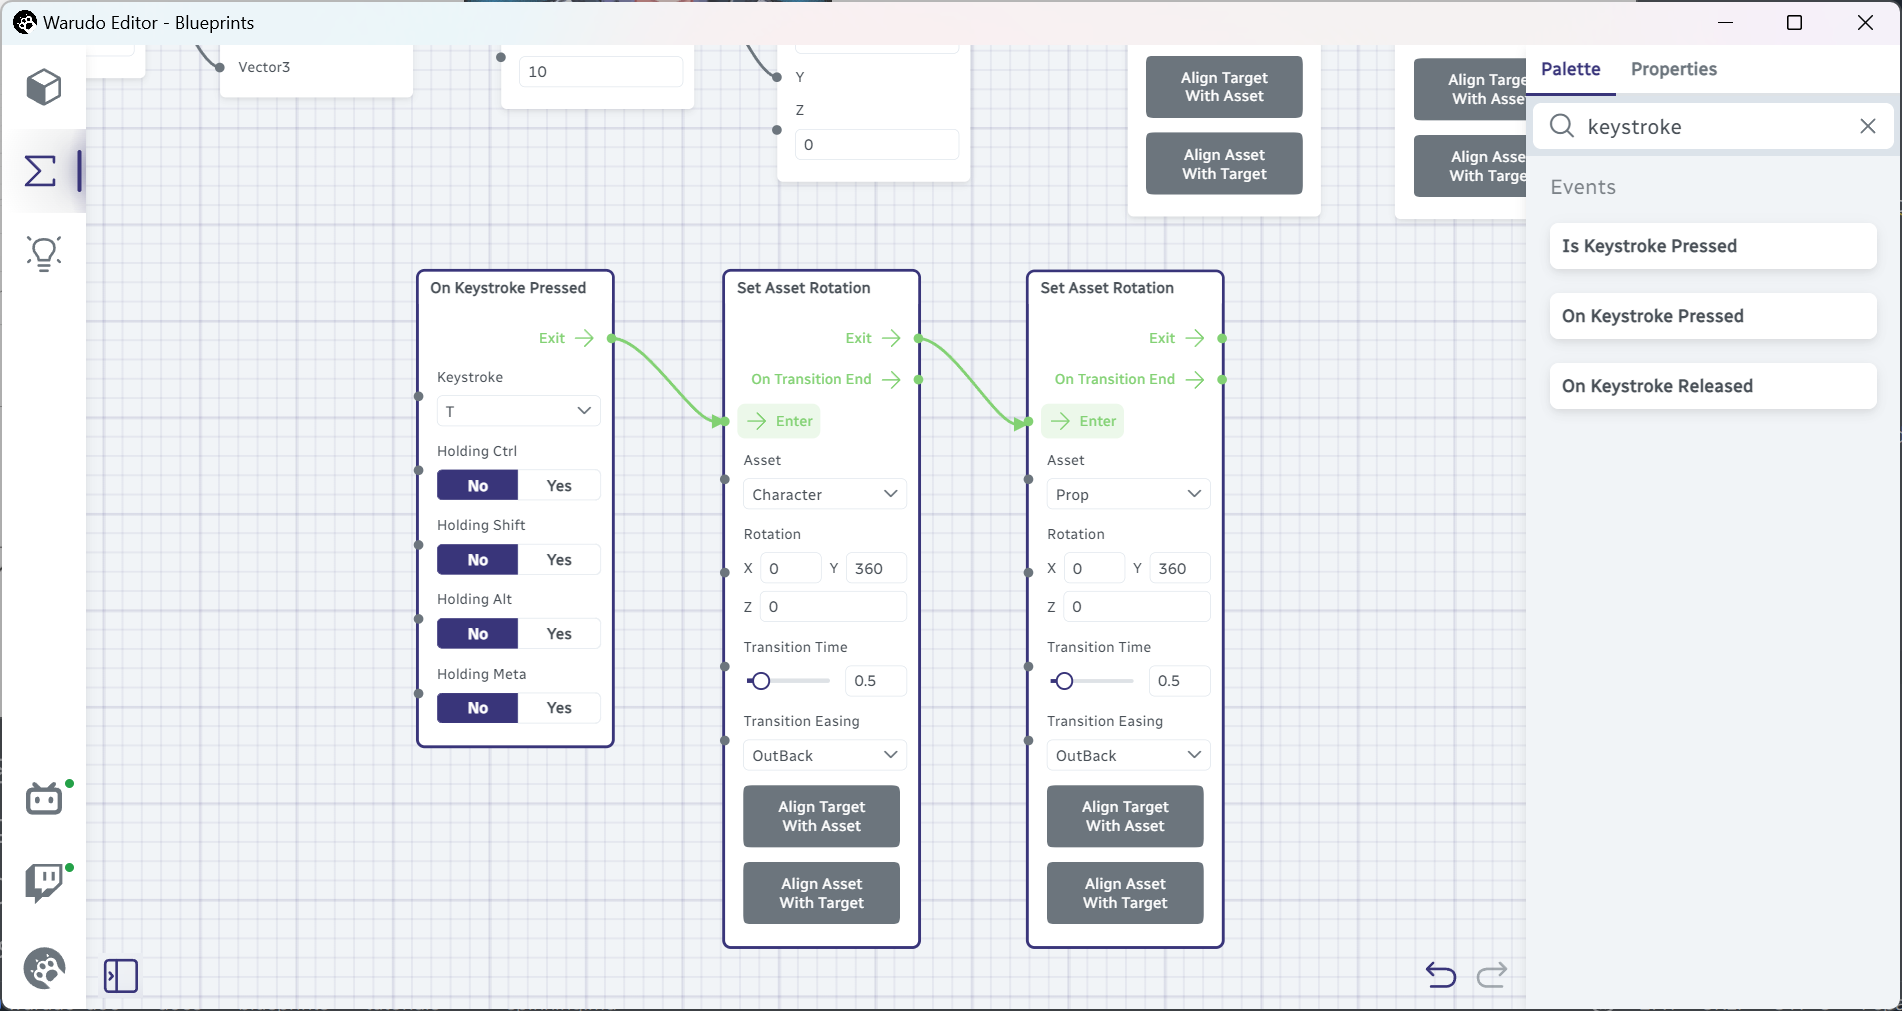
What they do is simple: when we press T, smoothly rotate the character and chair back to the original rotation. Note that Transition Time is set to 0.5 and Transition Easing is set to OutBack, which allows for a little bit of "bounce" at the end of the transition.
But wait, why are we rotating to (0, 360, 0)? Why don't we just set the rotation to (0, 0, 0)? This is because the Set Asset Rotation node will always rotate the shortest distance to the target rotation. Imagine you are currently rotated clockwise by 90 degrees; if you want to rotate back to 0 degrees, you can either rotate counterclockwise by 90 degrees, or rotate clockwise by 270 degrees. The Set Asset Rotation node will always choose the shortest distance, which is rotating counterclockwise by 90 degrees. But when you spin on a chair, you don't think about the shortest distance; you just want to keep rotating clockwise until you are back to the original rotation!
Therefore, we "trick" the Set Asset Rotation node by setting the target rotation to (0, 360, 0), and since the rotation returned by the Get Asset Rotation node is always smaller than or equal to 360 degrees, the Set Asset Rotation node will always rotate clockwise to 360 degrees.
Sequence
This is almost perfect, except for one tiny thing. Right now, if we want to stop spinning, we need to first press R, then press T. Can't we make it so that we only need to press R to stop rotating?
At first glance, this seems a simple task. We are quite familiar with the Flip Flop node, which alternates between two flow outputs. So, we just need to alternate between "opening the gate and start spinning," and "closing the gate and stop spinning, but also rotate back to the original rotation." The former is easy: we can just connect Flip Flop → A to Gate → Open.
But what about the latter? If we connect Flip Flop → B to Gate → Close, how do we also trigger the Set Asset Rotation node to rotate back to the original rotation? Remember, a flow output can only be connected to one flow input, so we can't connect Flip Flop → B to both Gate → Close and Set Asset Rotation → Enter.
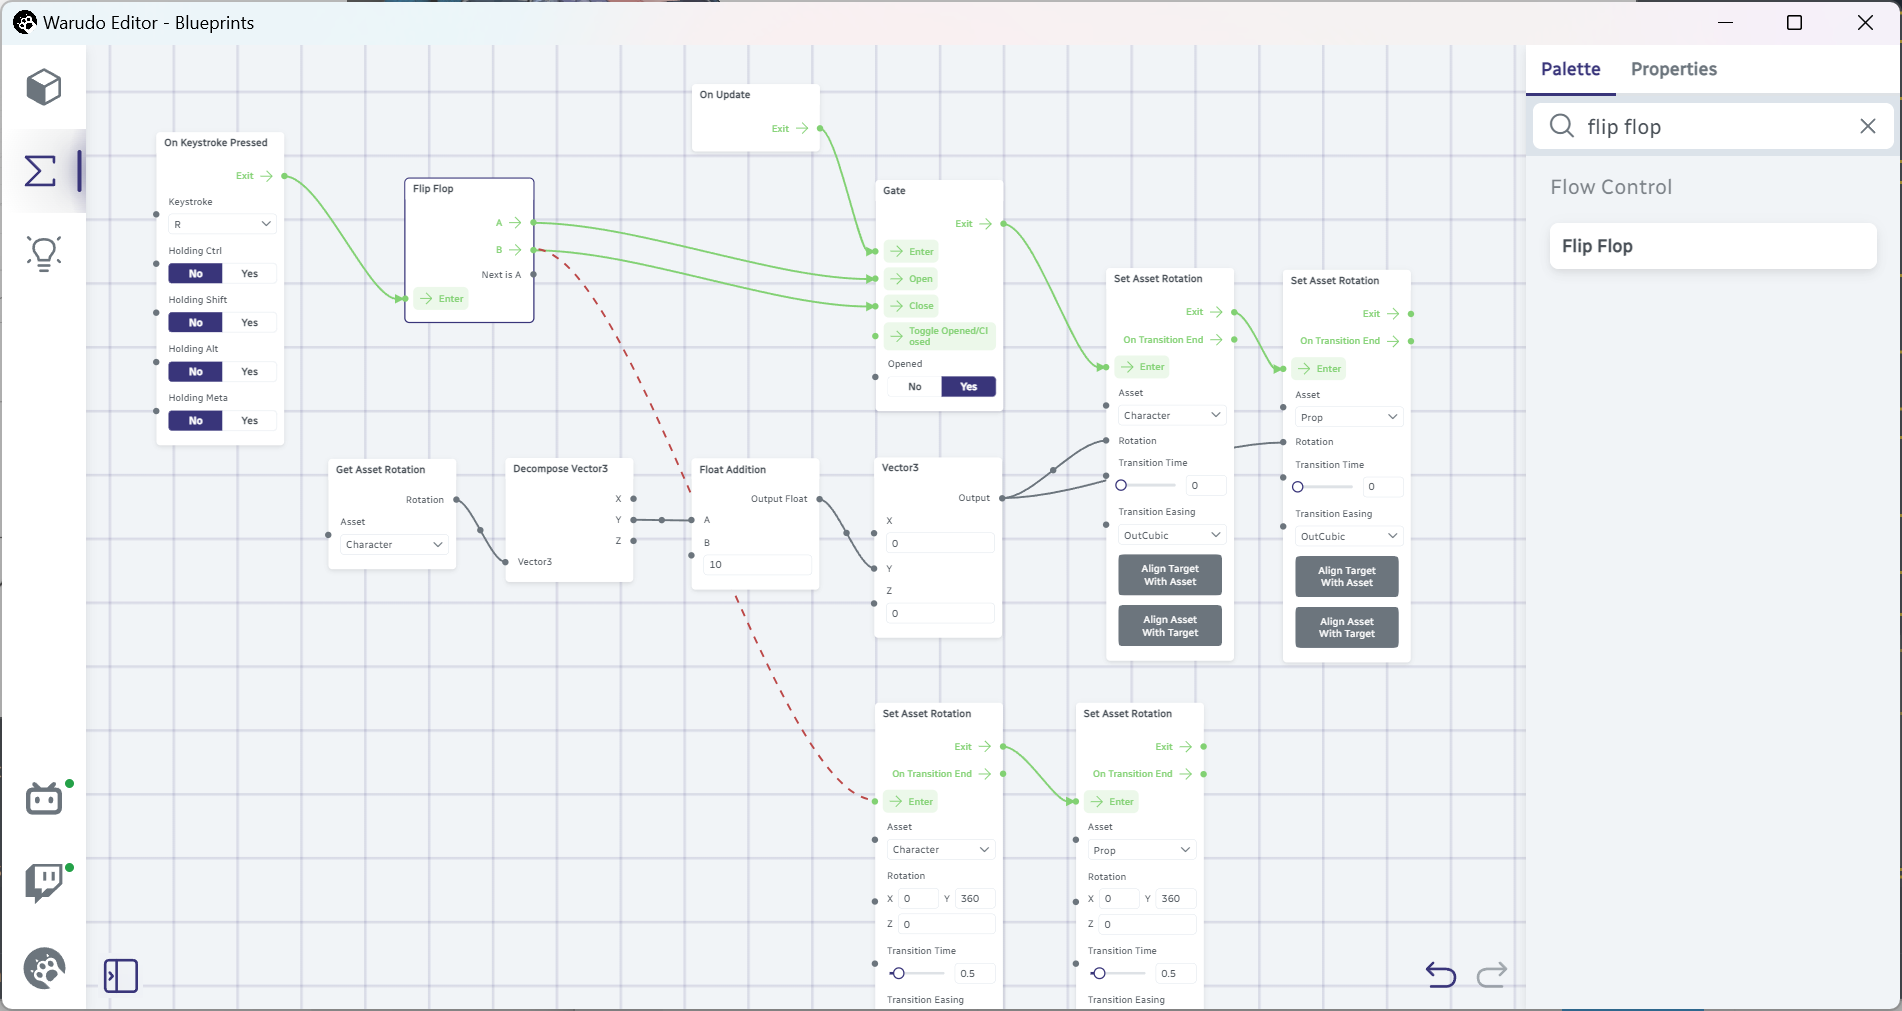
That is when we need the Sequence node. The Sequence node has a variable number of flow outputs; when it is triggered, it will trigger each flow output in order. Using the Sequence node, we can now close the gate first, then rotate back to the original rotation:
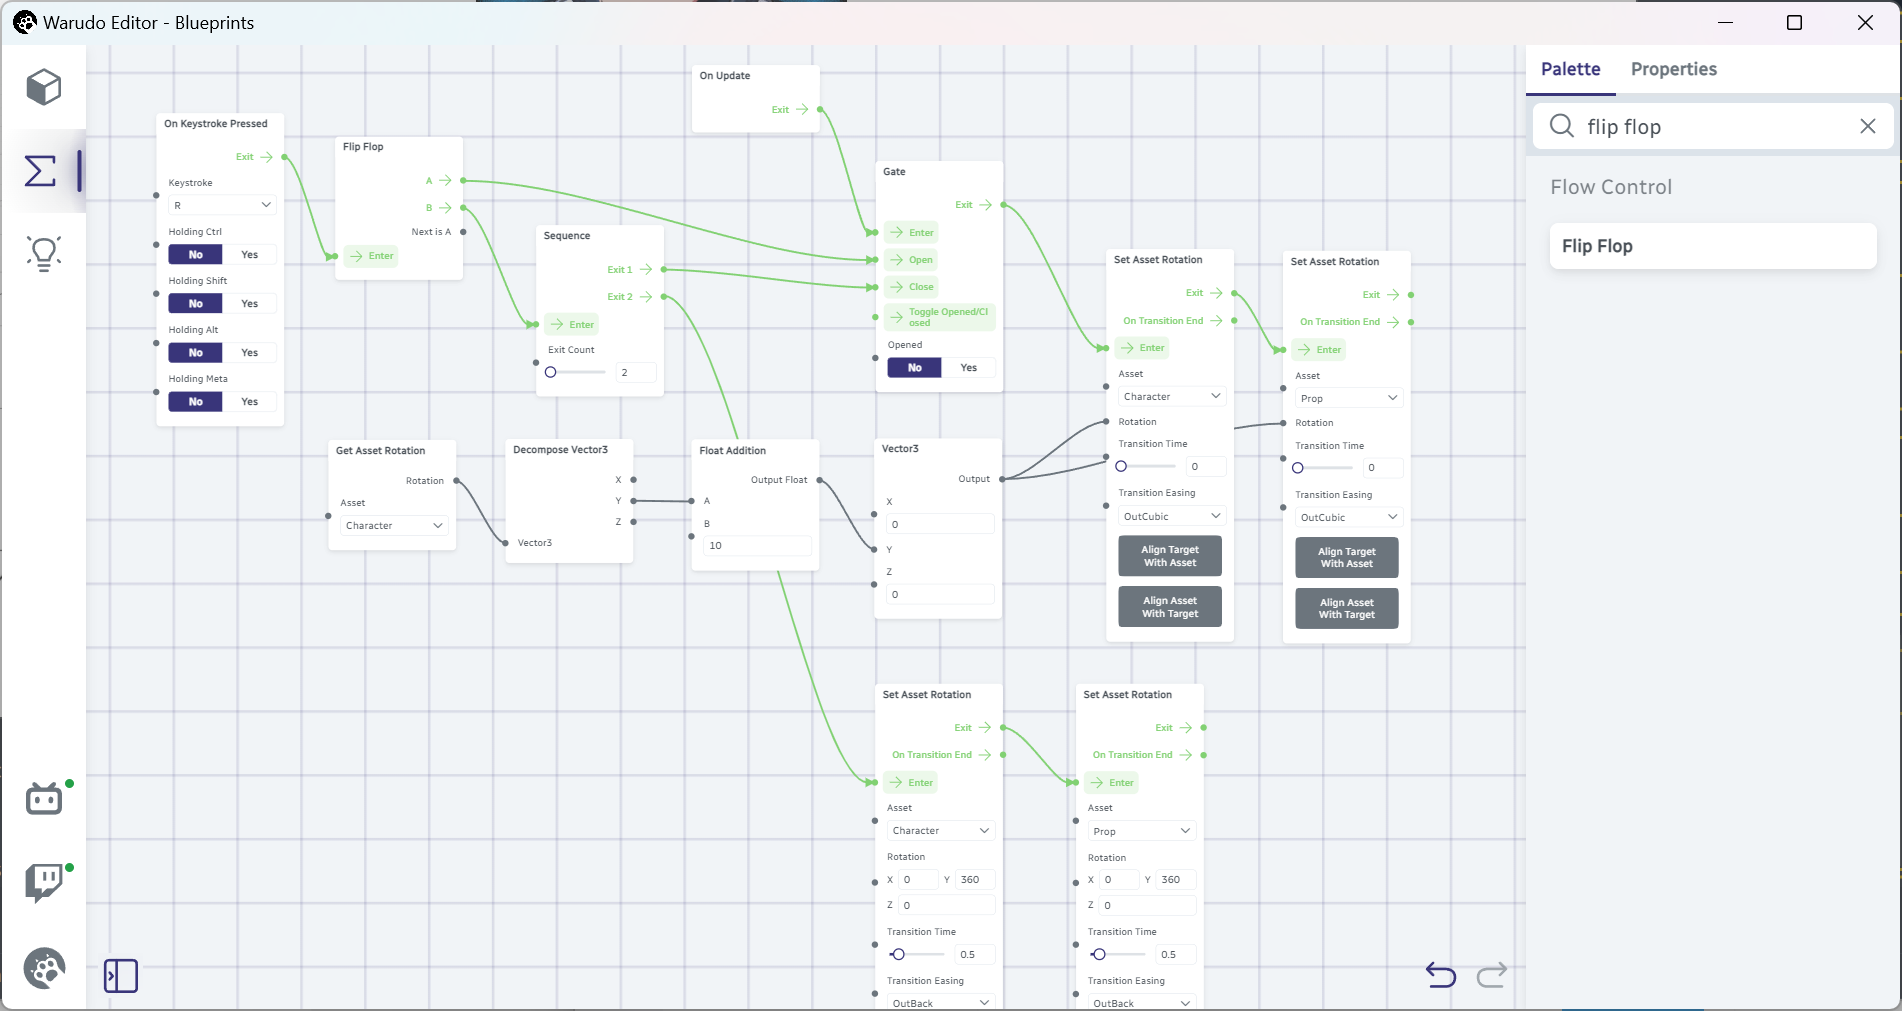
Now you only need to press R to start or gracefully stop spinning!