Overview
Warudo provides a complete modding system that allows you to import your own 3D assets into Warudo, including:
Mods in Warudo are created using the Warudo SDK. A SDK is basically a fancy way of saying "a set of tools that help you create mods," in this case, our Unity project! Mods exported by the Warudo SDK have a .warudo file extension and can be recognized by Warudo when placed in the corresponding data folders. You can share your mod files with others directly, or upload to our Steam Workshop via the Discover tab.

Browsing and sharing mods in the Discover tab.
Setup the SDK
To Setup the SDK, you need to setup Unity correctly first.
You can check the detailed steps at: Unity & Warudo SDK Installation
Custom Shaders
You can use any shader that is compatible with Unity's built-in rendering pipeline, such as lilToon and Poiyomi Shader.
Warudo Pro also supports the Universal Render Pipeline (URP), which allows you to use URP-compatible shaders.
Custom C# Scripts
What makes Warudo mods unique is that they can include C# MonoBehaviour scripts, enabling you to add interactivity to your mods. For example, you can add a script to your character mod to animate your character's ears, or add a script to your environment mod to control the lighting. To interact with Warudo's built-in components, please refer to the Scripting section.
Any C# scripts placed in the mod folder will be compiled and included in the mod. You can attach these scripts to your character, prop, or environment just like how you would do in a normal Unity project.
However, please note the following limitations:
- Assembly definitions (
.asmdef) are not currently supported. C# scripts covered by the assembly definitions will not be packaged into the mod. - ScriptableObjects are not currently supported.
- Compiled DLLs are not currently supported. You can only include
.cssource files. - Any scripts that reference the
UnityEditornamespace are not supported.
If you are including scripts in your mod, we recommend to set Log Level to All and uncheck Clear Console On Build in the Mod Settings window:
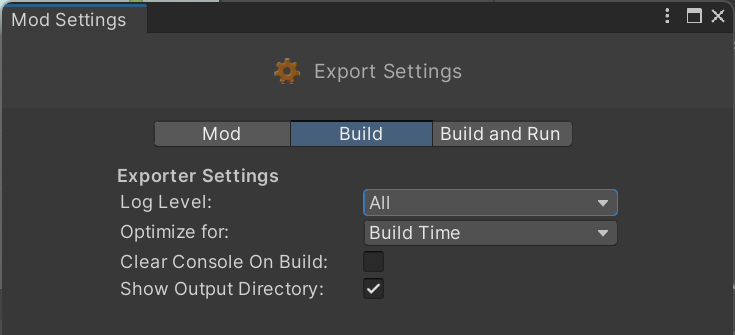
This provides more information when building the mod, so you can check the console for any errors. If you have checked scripts are placed in the mod folder but the build log states that no scripts are found so the compilation is skipped, it is likely that .csproj files were not generated correctly in your project. You need to click on Edit → Preferences → External Tools and click Regenerate project files:

Then, try building the mod again.
Backing Up Your Modding Project
We recommend making a backup of your modding project regularly or use Unity Version Control. Especially, if you are creating mods regularly, you should back up the Asset/Packages/UMod/ExportSettings.asset file (note this file is not visible in the Unity editor). This file stores the mod export settings, such as the mod export directory and the mod icon. If you lose this file, you will need to manually create all your mods again.
We have received reports that some users have lost their export setting after exporting a mod. This is currently under investigation. In the meantime, we recommend backing up the ExportSettings.asset file regularly.
Authors