Balloon Head
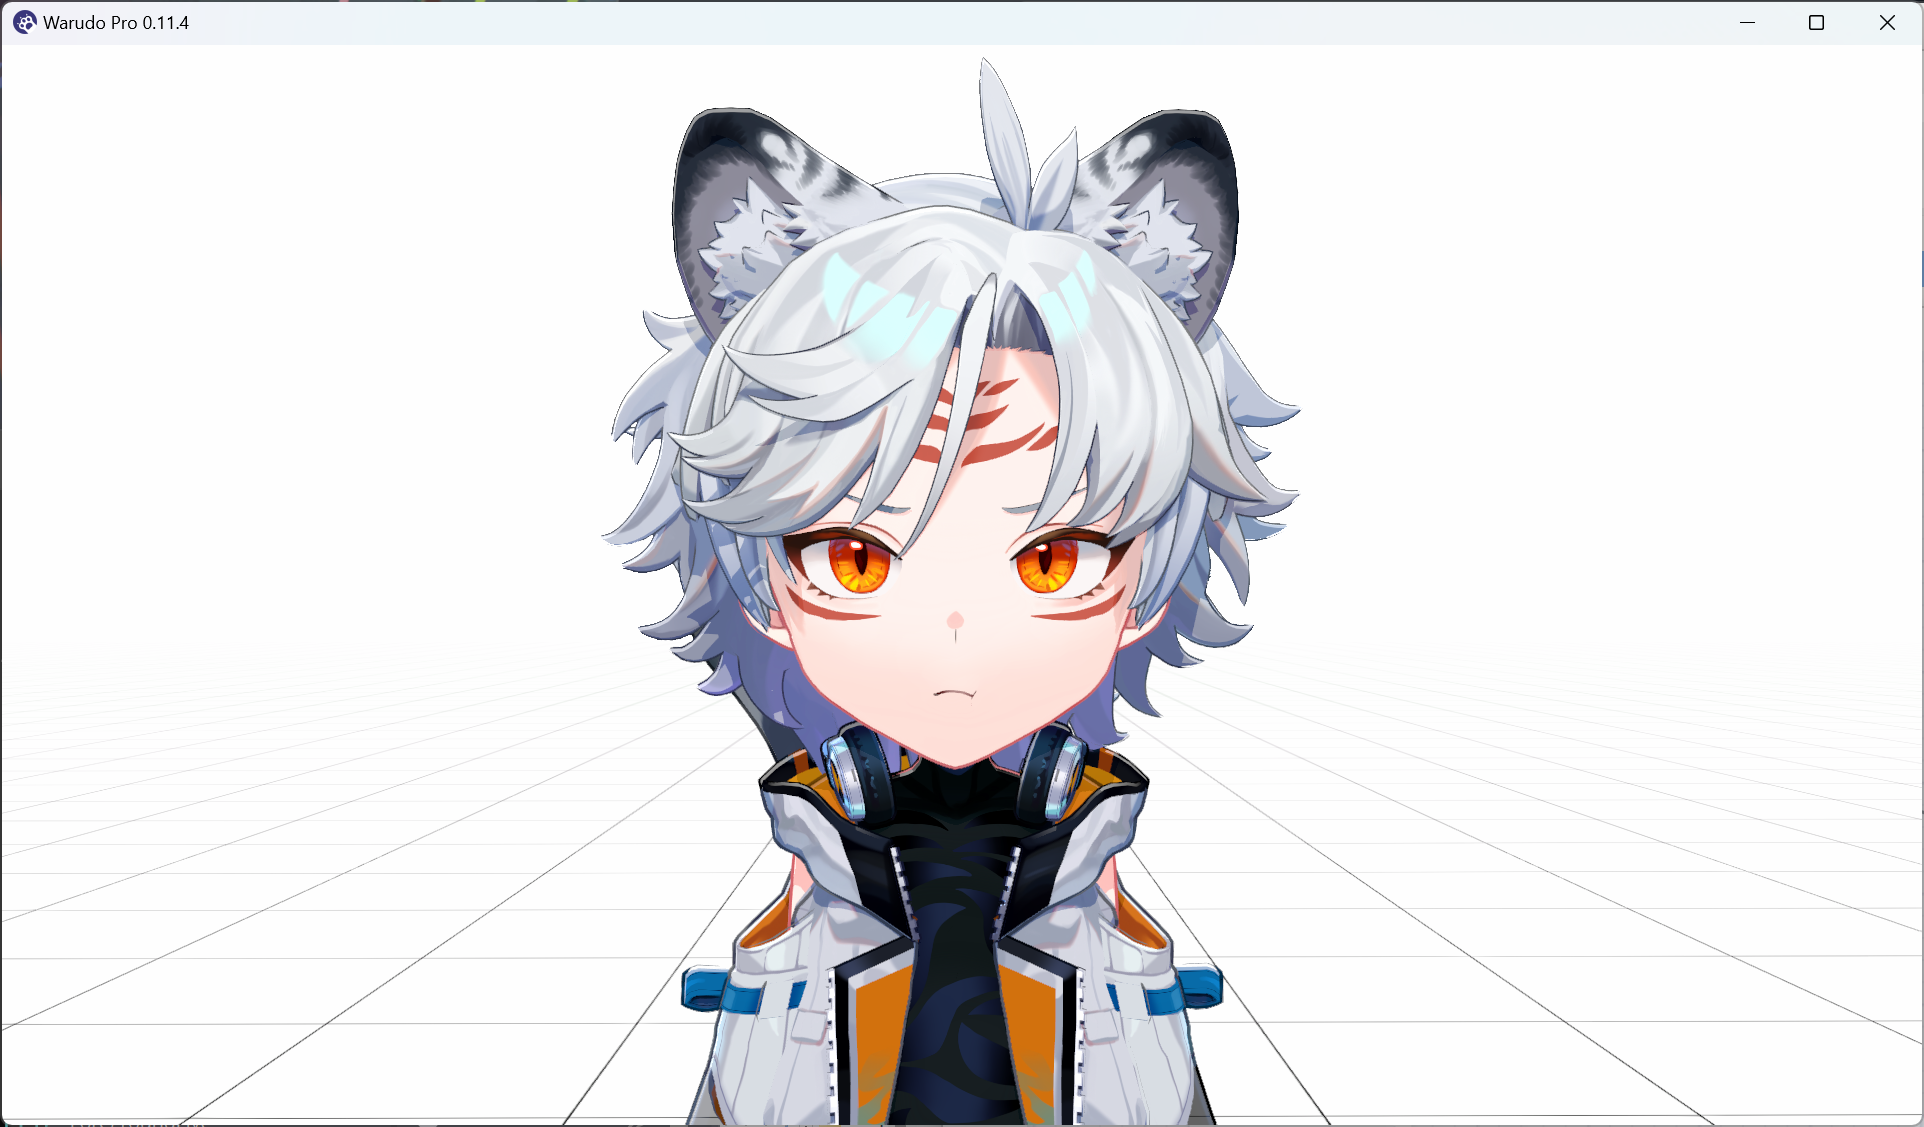
In this tutorial, we will inflate our character's head like a balloon using face tracking!
Puffing my cheeks to inflate my head.
Scaling Bones
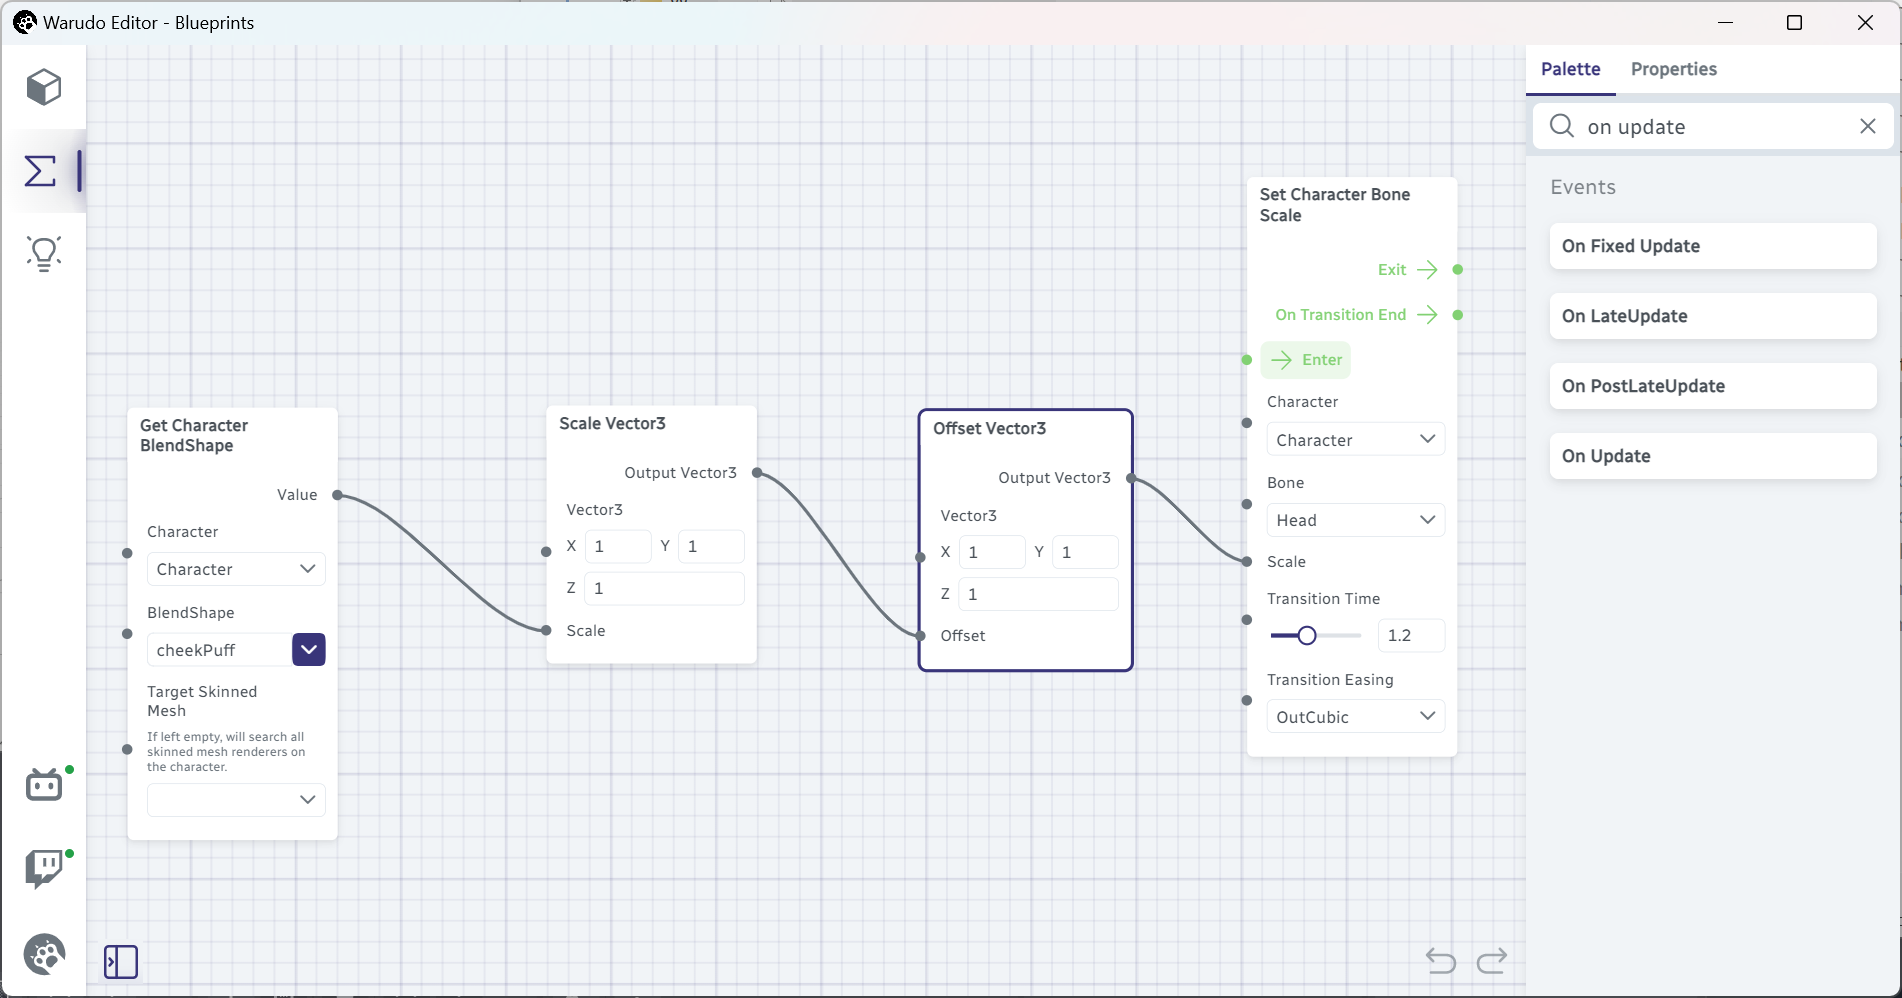
To inflate our character's head, we essentially need to scale up some bones on our character. A character in Warudo (or really, in any Unity app/game) has 55 bones, some of which are optional. The head bone is the one we are interested in, and it is called "Head" (duh). Let's add a Set Character Bone Scale node to the node editor, set Bone to "Head", and Scale to 1.1.
By default, when you set the Scale option, all XYZ axes are set to the same amount. This is called uniform scaling. If you want to scale each bone axis individually, you can click on the Uniform Scaling button next to the Scale option to toggle it off.

Click on Enter to test the node. You should see your character's head slightly grow bigger!
Reading Face Tracking Data
Now that we have a way to scale the head bone, we need to figure out when to scale it. A fun way to trigger the scaling is to puff our cheeks!
To know when we are puffing our cheeks, we can use the Get Character BlendShape node. Let's add it to the node editor:
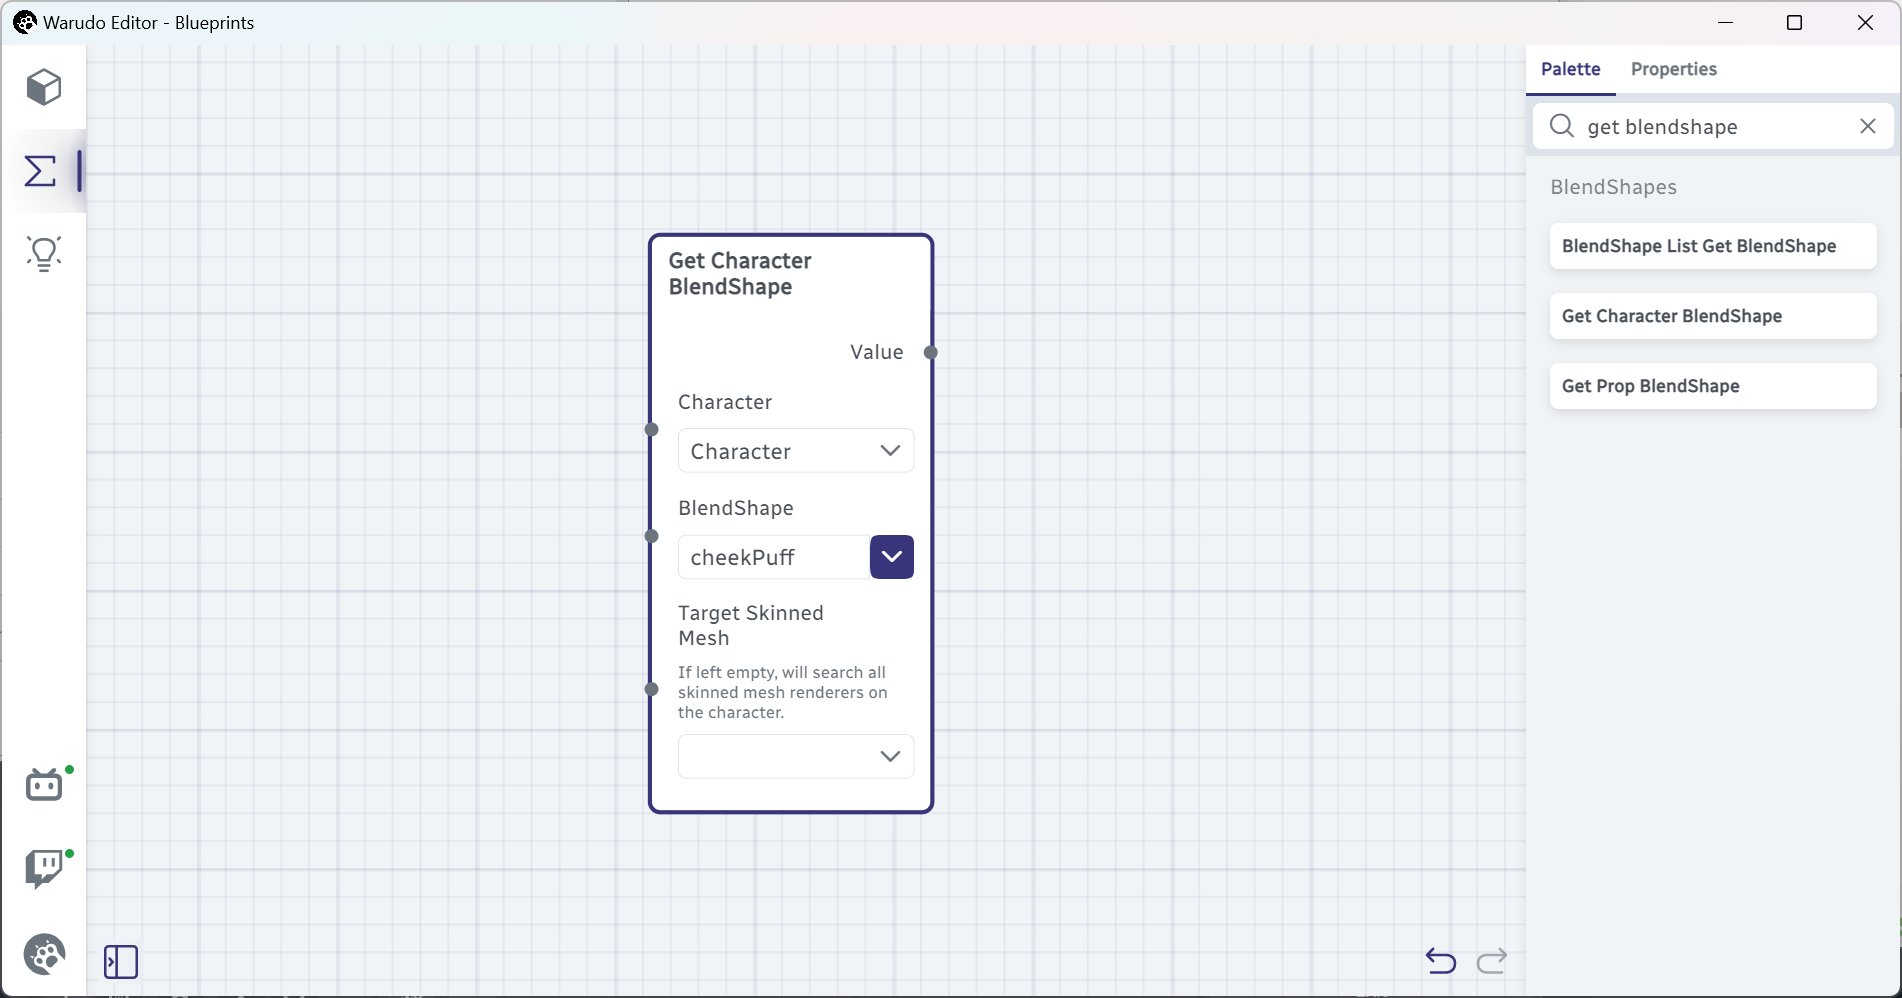
For the BlendShape option here, you should select the blendshape that corresponds to puffing the cheeks; if you have an ARKit-compatible character model, the blendshape is usually called "cheekPuff" or "CheekPuff".
If you don't have an ARKit-compatible character model, or you are not using an iPhone to track your face, then you will not have the cheek puff blendshape or tracking data. In that case, you can change the trigger to using your mouth instead. For example, you can use the "jawOpen" (for models with ARKit blendshapes) or "A" (for models with only VRM blendshapes) blendshape to trigger the inflation.
You can use the Inspect Value node to see the value of the blendshape, like this:
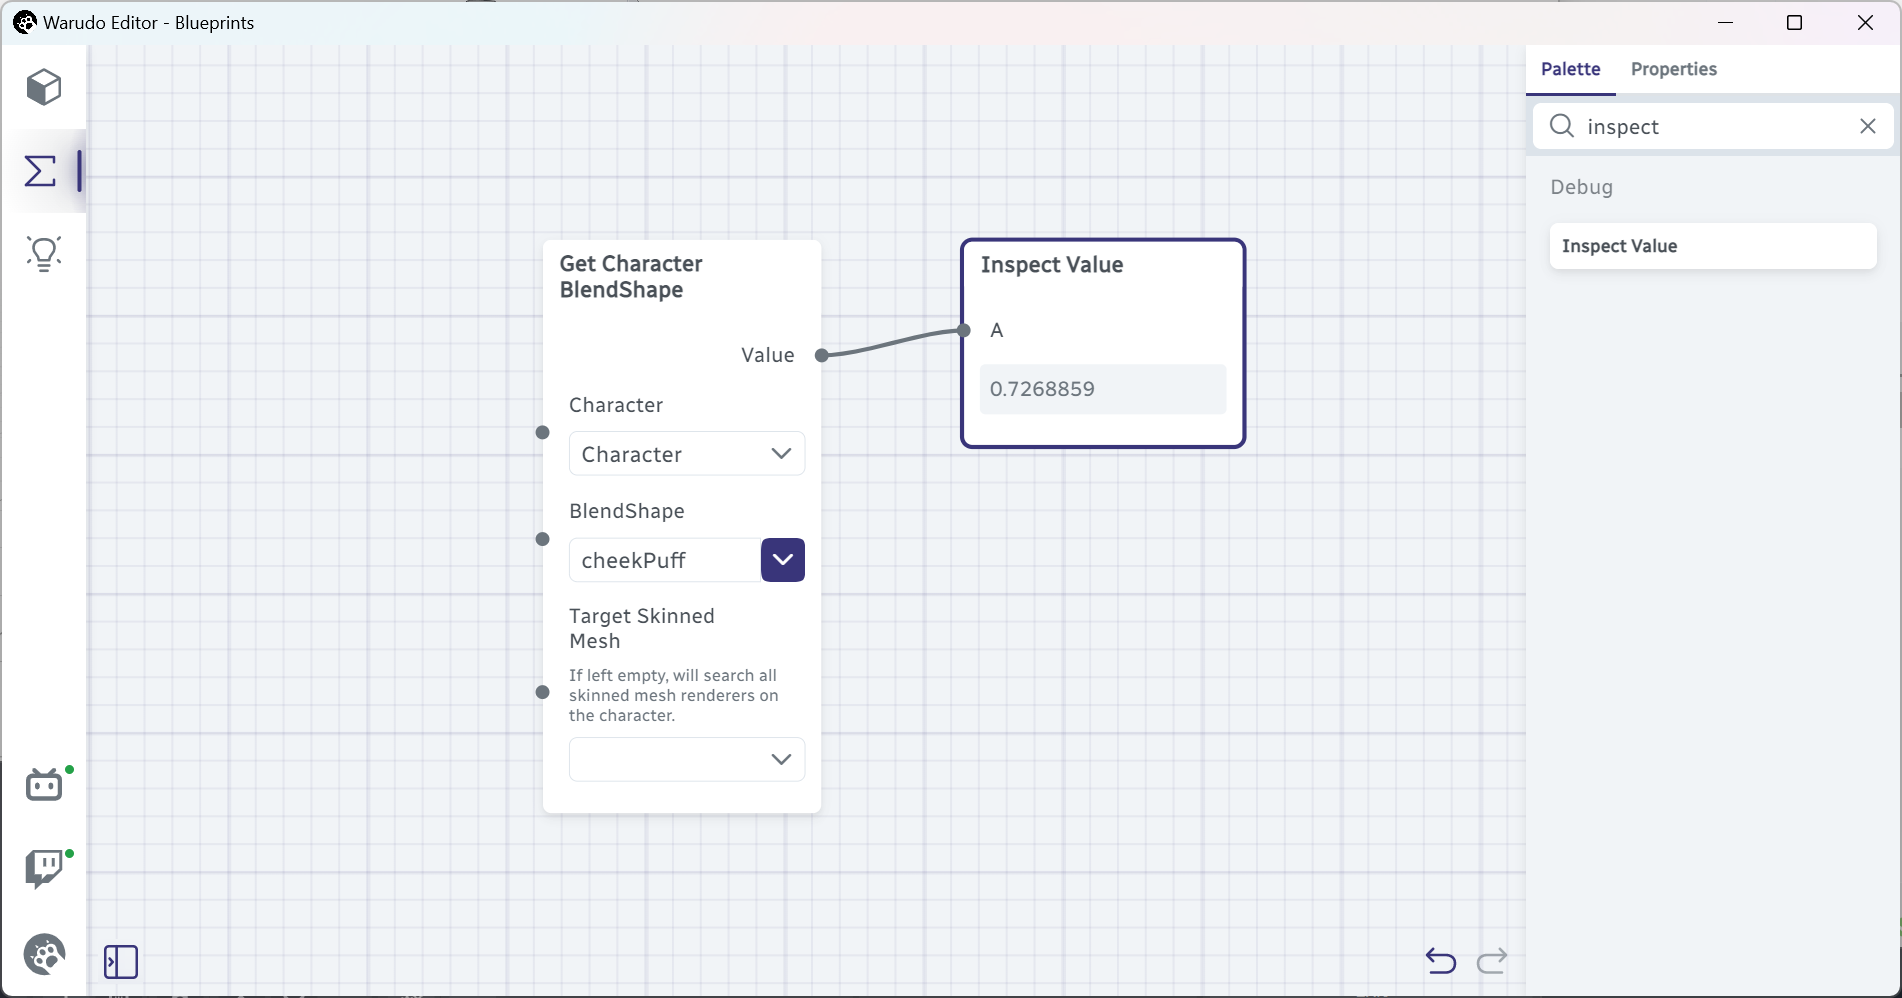
Try puffing your cheeks, and you should see the value fluctuate between 0 (when you are not puffing your cheeks) and 1 (when you are puffing your cheeks).
Now we are ready to connect the nodes together. We just need to connect the blendshape value to Set Character Bone Scale → Scale, right? Wait...
Warudo is not letting us connect the nodes together! What's going on? Well, Get Character BlendShape → Value outputs a decimal number, but the Set Character Bone Scale → Scale option is three numbers, X, Y, and Z! More formally, we need to create a vector from the 0-1 decimal number. (A vector is just a fancy word for "more than one number.") To do this, we can use the Scale Vector node:
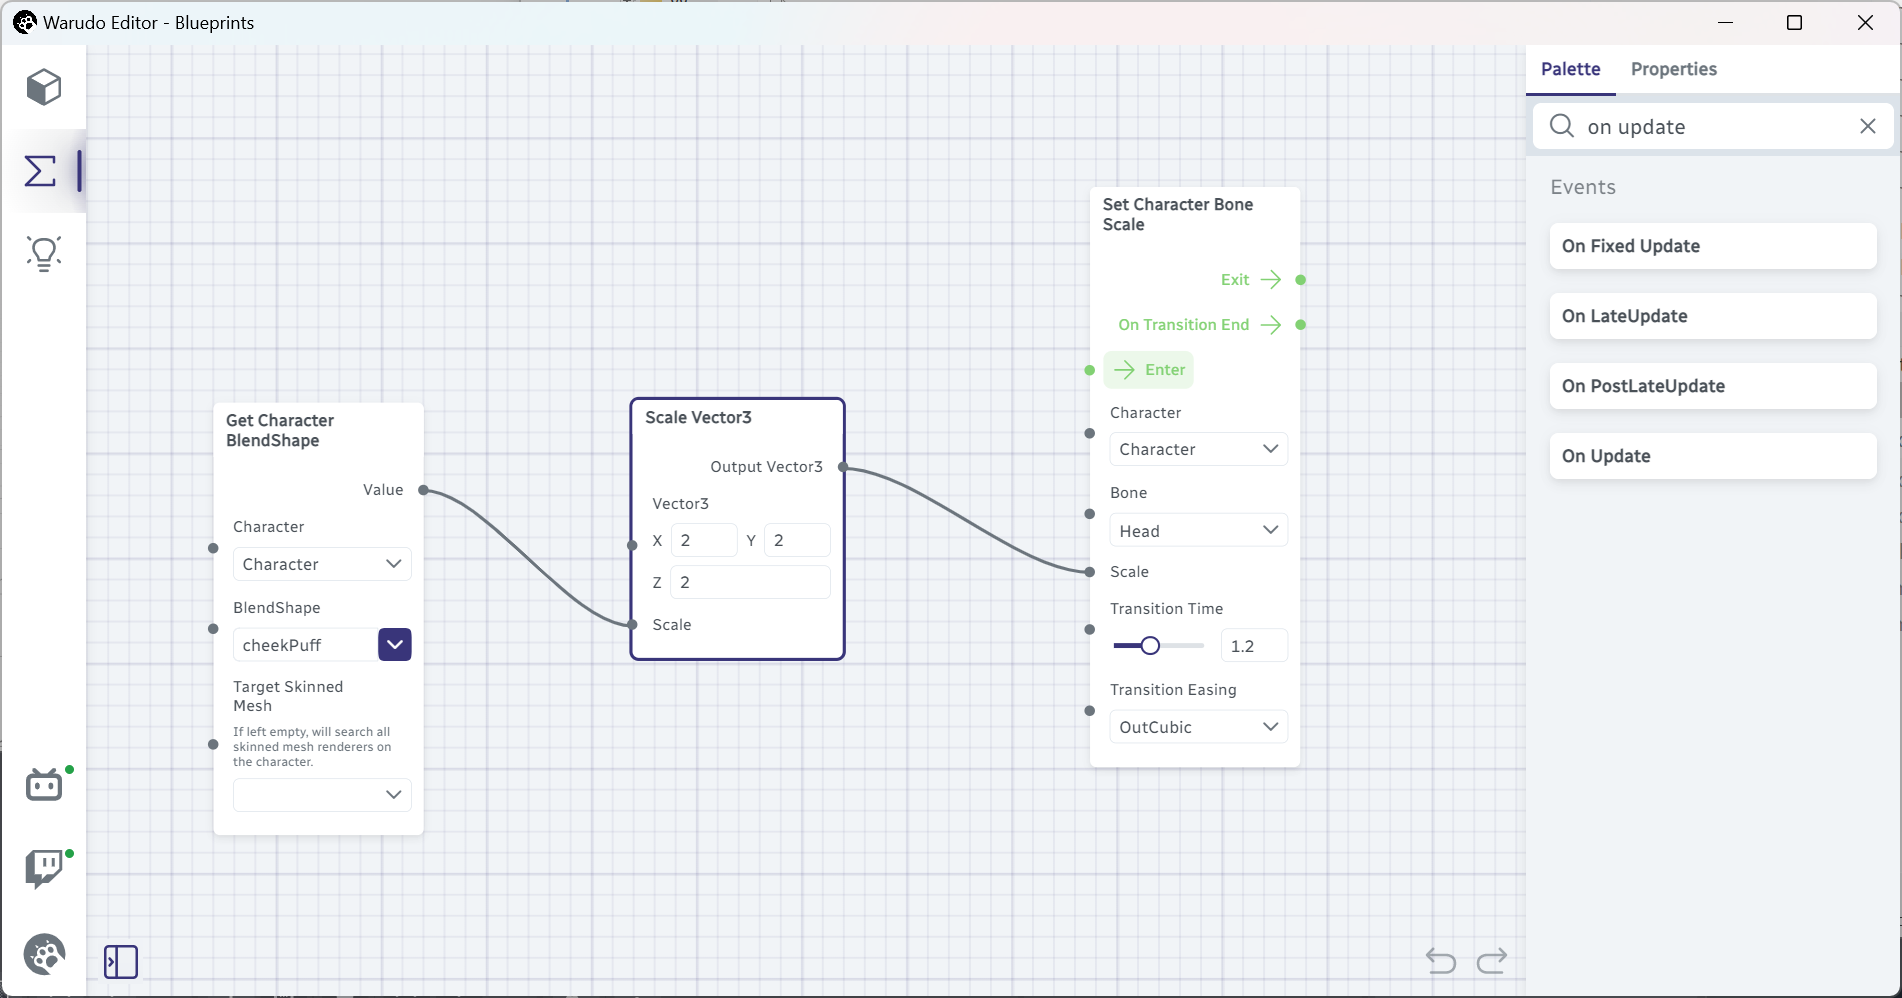
This node takes a Vector3 (i.e., three decimal numbers X, Y, and Z) and a float (i.e., a decimal number) and outputs a scaled Vector3. For example, if the inputs are (1, 2, 3) and 5, then the output will be (5, 10, 15); if the inputs are (2, 2, 2) and 0.5, then the output will be (1, 1, 1).
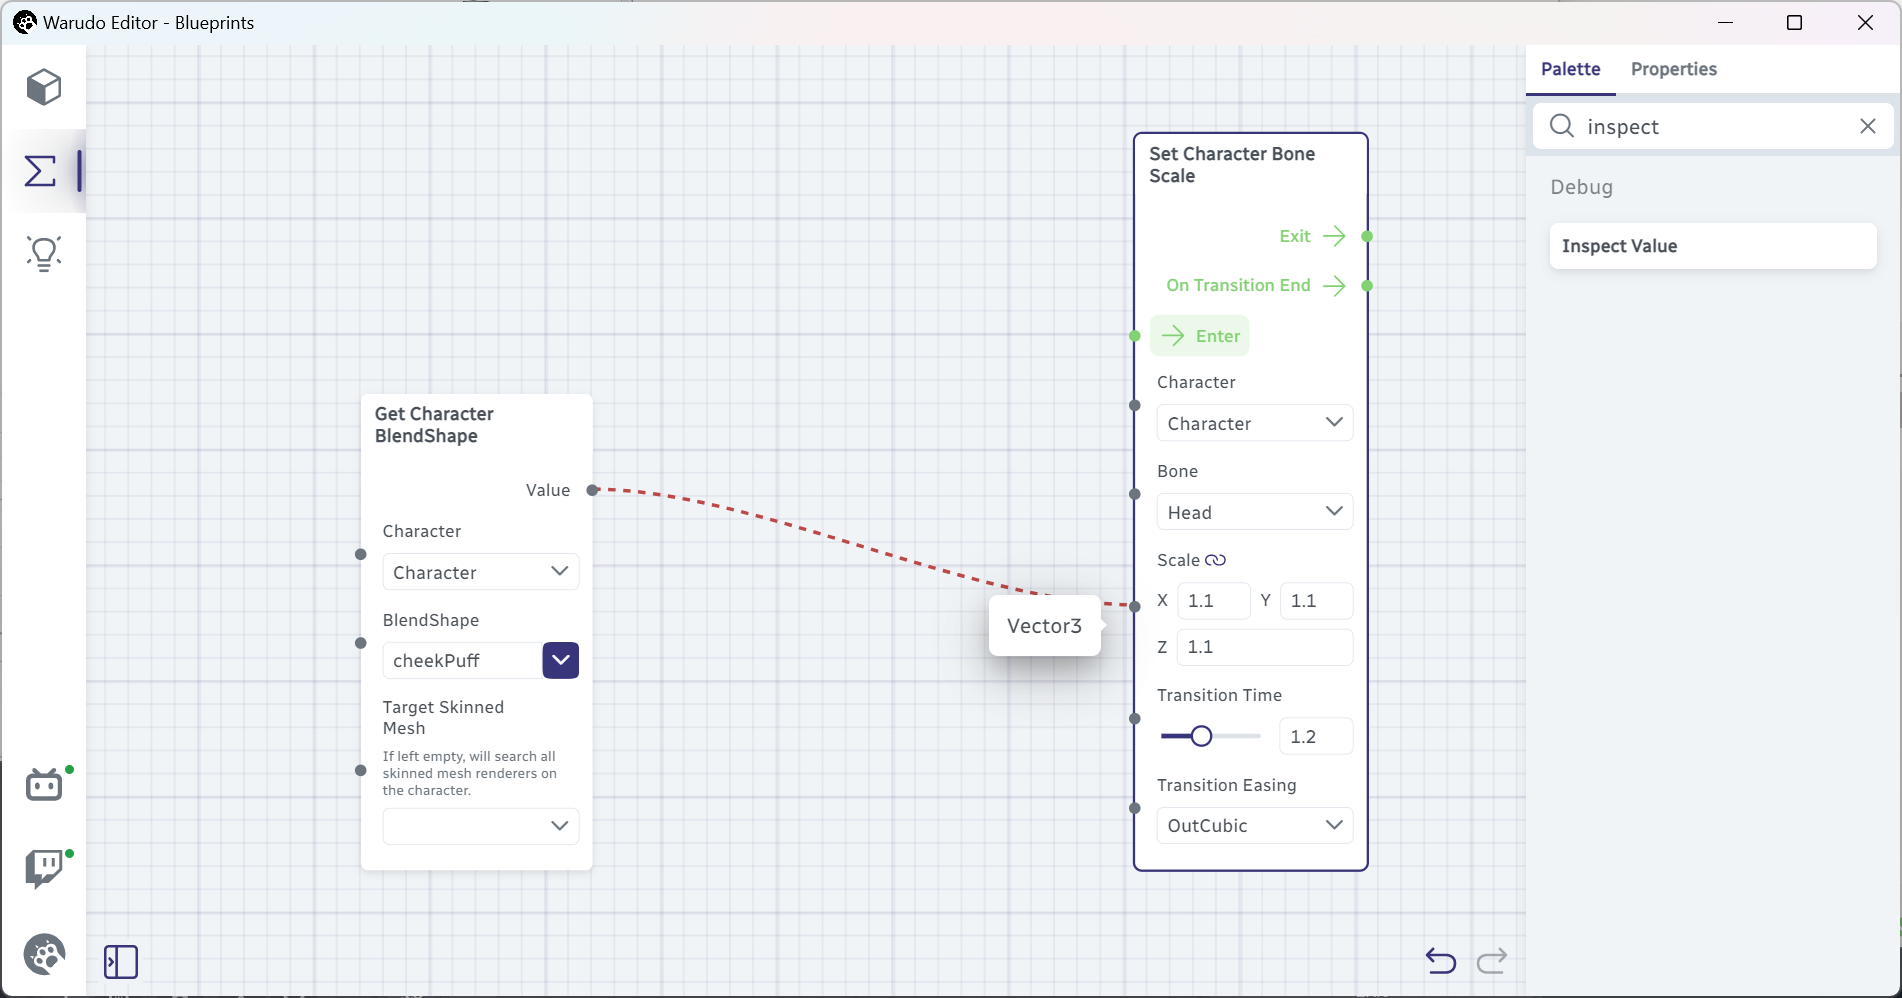
For now, let's set the Vector3 option to (2, 2, 2) and connect the nodes together like above, and see what happens when we puff our cheeks.
Huh, nothing is happening...? That is because the Get Character Bone Scale node is never triggered! For now, let's just manually trigger it. Puff your cheeks again, but this time also click on Get Character Bone Scale → Enter. You should see your character's head grow bigger!
But here's a problem: if you stop puffing your cheeks and click on Get Character Bone Scale → Enter again, your character's head will become like this:

Before reading on, can you guess why this is happening?
Intro to Arithmetics
Let's take a step back and think about what we are doing here. We are taking the value of the cheek puff blendshape, which is a decimal number between 0 and 1, and we are using it to scale three numbers (2, 2, 2). What would be the maximum value and the minimum value of the three numbers?
Well, the maximum value would be (2, 2, 2), which means our head will be twice as big as the original size. But the minimum value would be (0, 0, 0), which means our head will be gone! That's why when we stop puffing our cheeks, our character's head disappears.
To fix this, we need to make sure that the minimum value is (1, 1, 1), so that our character's head will never disappear. How can we do this? Well, how about always adding 1 onto each number? We can use the Offset Vector3 node to do this:
Note that we have changed Scale Vector3 → Vector3 to (1, 1, 1), and Offset Vector3 → Offset to (1, 1, 1). Now, when we puff our cheeks and click on Enter, our character's head will grow bigger, but when we stop puffing our cheeks and click on Enter again, our character's head will return to its original size.
To see why this works, let's run through the calculations again. When we puff our cheeks, the maximum value would be (1, 1, 1) + (1, 1, 1) = (2, 2, 2), and the minimum value would be (0, 0, 0) + (1, 1, 1) = (1, 1, 1). That's exactly what we want!
On Update
I hope you hated manually triggering the Get Character Bone Scale node as much as I did. Indeed, we can't be clicking in our blueprint every time we want to inflate our character's head. Only if there is a way to automatically trigger the node... Wait, there is?

The On Update node is an event node that is triggered every frame when Warudo is running. For instance, if Warudo runs at 60 FPS, then the On Update node will be triggered 60 times per second. This node saved us from clicking 60 times per second, whew.
Remember you can add nodes after the Get Character Bone Scale node to trigger more effects using your cheeks! Try to add a Set Character BlendShape node to activate a blendshape on your character when you puff your cheeks. Hint: Set Character BlendShape → Target Value is a decimal number between 0 and 1, so you can connect Get Character BlendShape → Value directly to it.
Resetting Bone Scale
Now you can use this blueprint to inflate your character's head in your streams, but you probably don't want to enable this effect all the time. So, because you know event nodes in a disabled blueprint will not be triggered, you decide to only enable the blueprint when you want it and disable it afterwards.
But there's a small problem: when you disable the blueprint, the head bone scale may not be (1, 1, 1). Maybe you were puffing the cheeks at that moment! Let's use the On Disable Blueprint node to fix this:
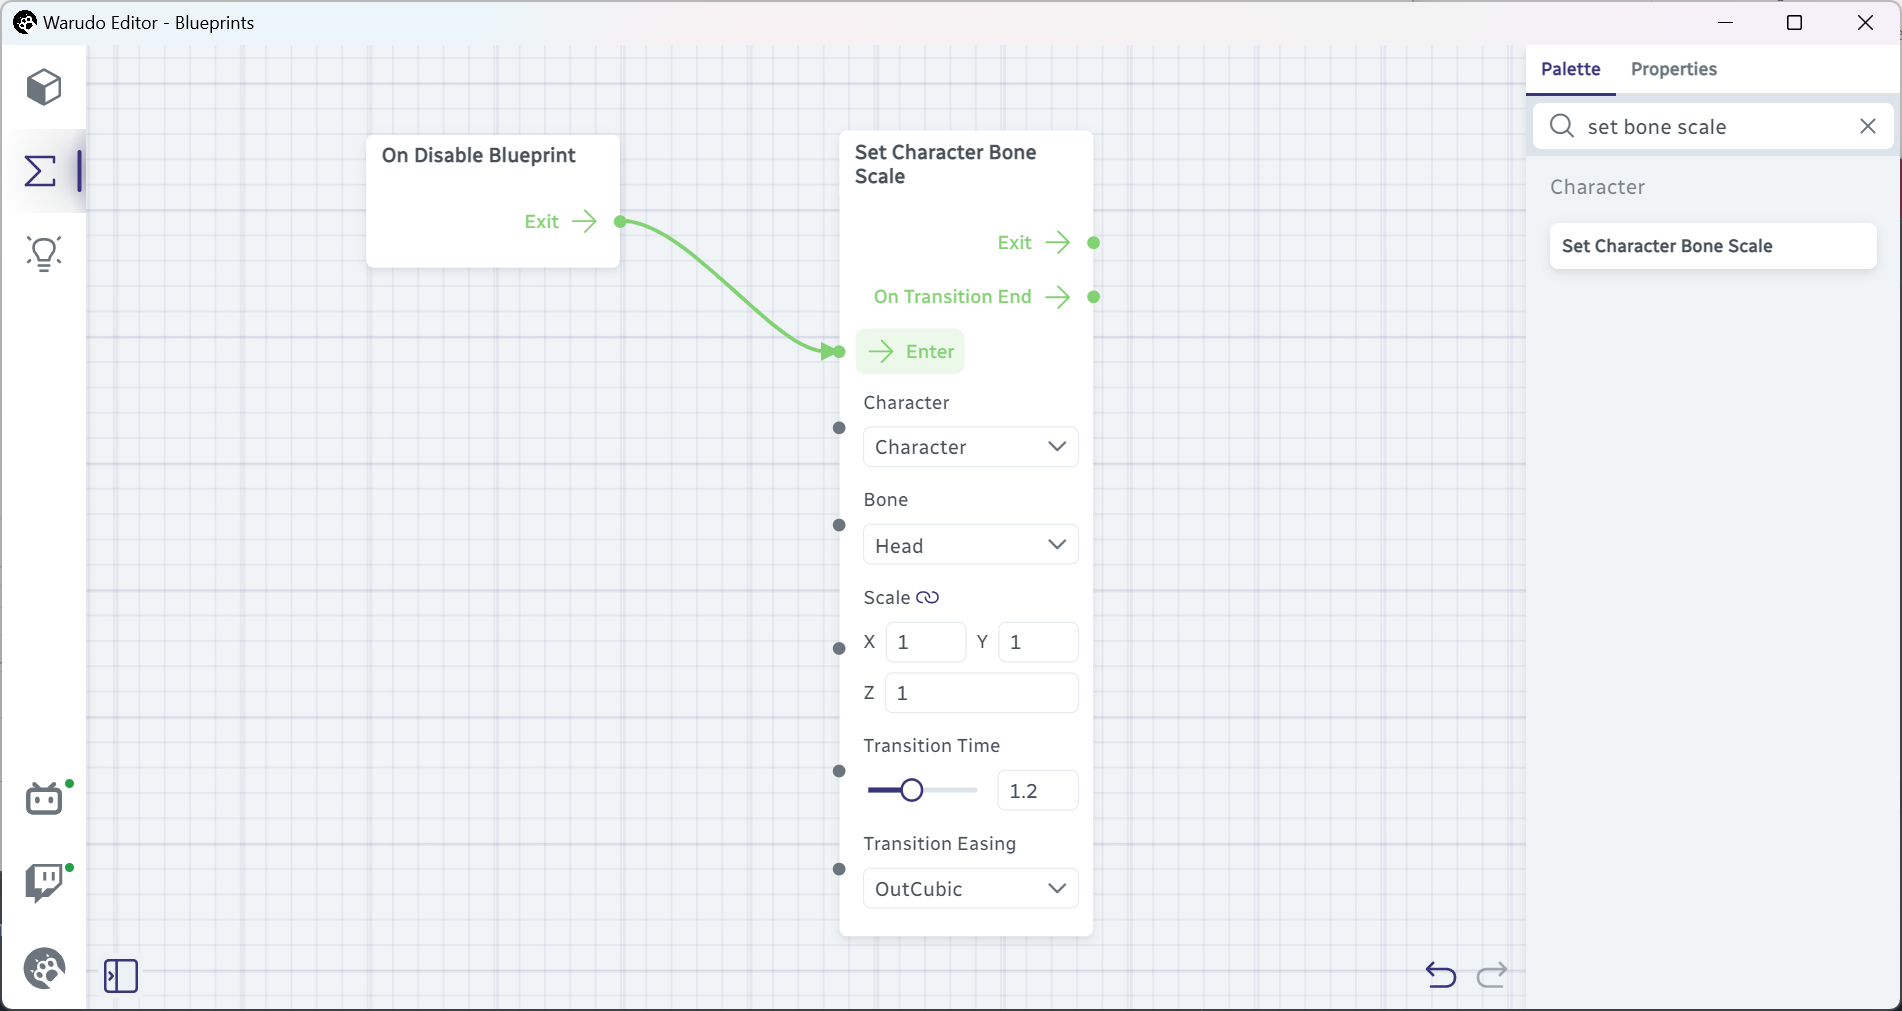
The On Disable Blueprint node is a special node that is triggered when the blueprint is disabled. Now, when you disable the blueprint, the head bone scale will be reset to (1, 1, 1). Problem solved!
More on Reading Face Tracking Data
This section is intended for advanced users. Feel free to skip it if it reads like gibberish to you.
In this tutorial, we used the Get Character BlendShape node to read the face tracking data. But that's not entirely true: we are not truly reading face tracking data, but rather, we are reading the blendshape value that is generated and applied on the character by the face tracking data. This is a nuanced but important distinction. For example, let's say the raw cheekPuff blendshape value from iFacialMocap is 0.5, but we may have configured in iFacialMocap Receiver → Configure BlendShapes Mapping such that the cheekPuff blendshape applied on the character is essentially multiplied by 2 = 1.0. In this case, even if we just half puff our cheeks, the character's head will still inflate to the maximum size. Also consider this: if we disabled Character → Motion Capture, the cheekPuff blendshape on the character will always be 0, even if we are puffing our cheeks!
In many cases, this would be fine, but if you want to depend on the actual face tracking data, you should use the Get Receiver/Tracker Data node for your face tracking system. For example, since I am using iFacialMocap, I can use the Get iFacialMocap Receiver Data node and the BlendShape List Get BlendShape node to get the actual cheekPuff blendshape value:
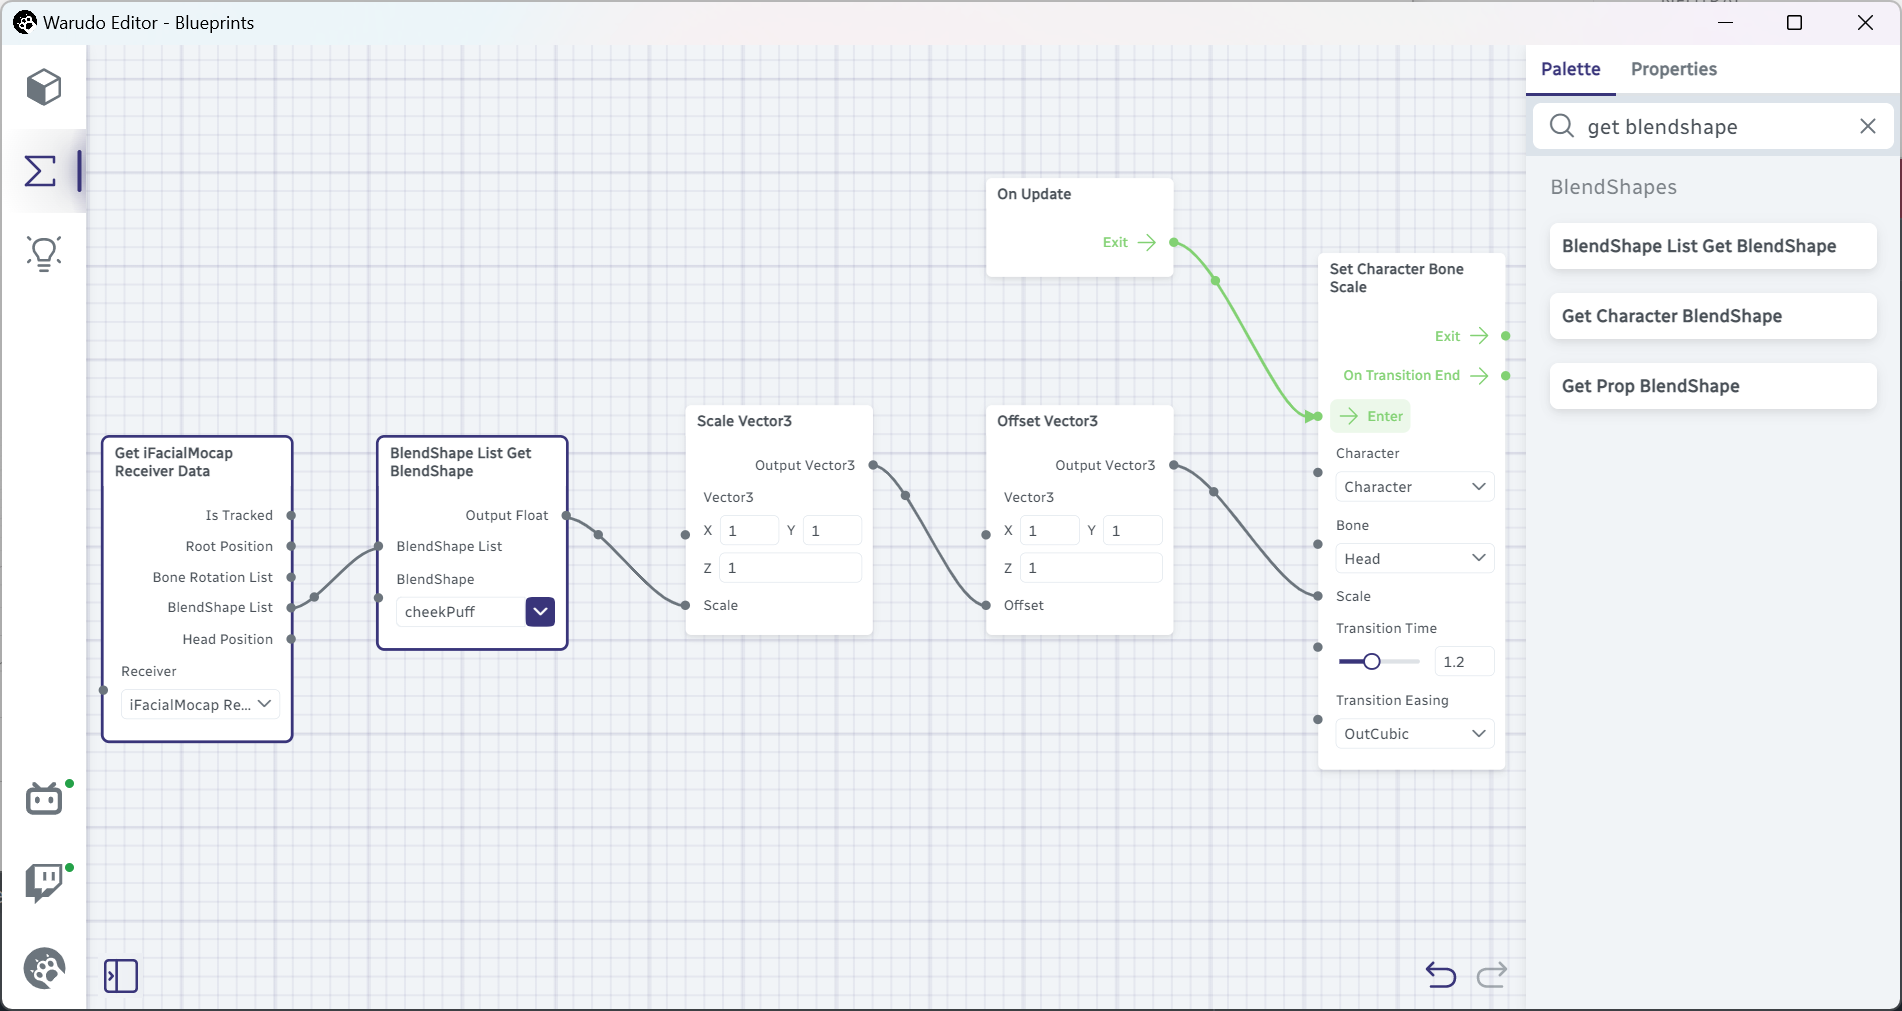
The downside of this approach is that this blueprint won't work if we are not using iFacialMocap. The plus side is that we are no longer depending on any character blendshape; the character doesn't even need to have a cheekPuff blendshape, and we can still use puffing our cheeks as a trigger for a variety of fun effects!
Authors